
To keep my sanity during these stressful times, my baking marathon continues. For me, baking is not only relaxing, it gives me something to focus on, fuels my creativity, as well as provides a really yummy end product (well, most of the time). Even if it doesn’t look good, most bakes taste good and that’s really all that matters.
I found this recipe (originally from the Quaker Oats company) as I was cleaning out old cookbooks. It looked quick and easy, perfect for today’s rainy day … and perfect to go along with a hot steamy cuppa and a good book. Give it a try, you won’t be disappointed.
OATMEAL SCONES
Bake at 425° for 20 to 30 minutes. Makes 8 to 10 scones (or more, depending upon the size)
2 cups all purpose flour
1 cup oatmeal (any type will do)
1/4 cup sugar
1 tablespoon baking powder
1 teaspoon salt
1 stick cold butter, cubed
3/4 cup milk
1 egg, lightly beaten
1 teaspoon vanilla
Topping – optional
1/2 cup chopped walnuts
1/2 teaspoon cinnamon
2 tablespoons sugar
Glaze
3/4 cup powdered sugar
1 to 2 tablespoons orange juice
 First, line up all your ingredients. Don’t be one of those bakers who goes looking for things as you go along. If you have everything in front of you, you’re less apt to make a mistake and forget something. Then, preheat your oven and prepare your pan. Most ovens take 20 minutes or more to heat up thoroughly. A $5.00 oven thermometer is a great investment and saves a lot of baking disasters.
You don’t need any special equipment to make these, but I did use my food processor. Nothing is quicker than a food processor … as long as you know how and when to use it. The “pulse” button is all you need for these!
 In a large bowl (or food processor) add the dry ingredients. Mix well or pulse two or three times. Cut the icy cold butter into cubes and add it to the dry ingredients until it resembles fine crumbs. Again, if using a food processor, PULSE 10 or 12 times … no more!
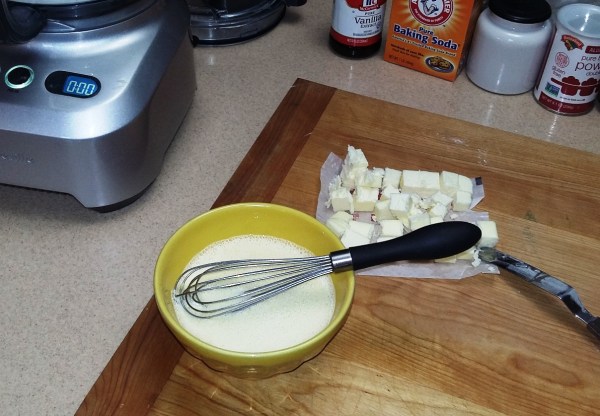 In a small bowl mix together the egg, milk and vanilla. Then add this wet mixture to the dry mixture. Stir it in with a fork or PULSE a few times just to combine everything.
 Turn the mixture out onto a floured board. Knead a few times to bring it together. Do not overwork the dough or your scones will be tough and won’t rise properly.
 Form the dough into a round and with a rolling pin, gently roll until you have about 3/4″ thickness. Cut the dough into triangles (or you can use a cutter to cut out shapes). Place the triangles onto a parchment lined baking tray.
 In another small bowl, mix the chopped nuts, sugar and cinnamon. Sprinkle over the scones, pressing down lightly to fix them onto the scones. This is completely optional.
Bake the scones in a preheated 425° oven for 25-30 minutes (if smaller scones are made, you may need to reduce the baking time. When they have baked through and are browned, remove them and place them on a wire rack to cool.
Combine the powdered sugar and orange juice and just drizzle over the top of the scones. Then be prepared to watch them disappear.
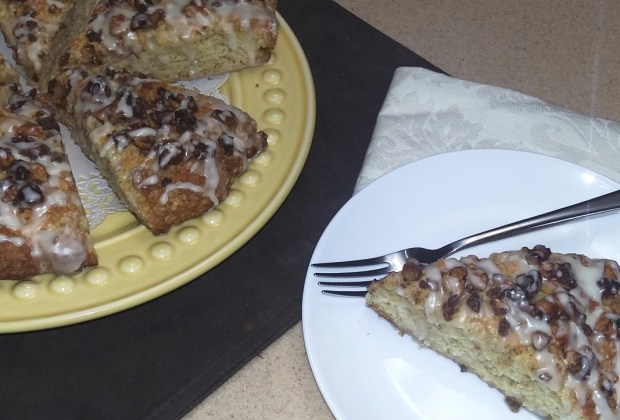
Be sure to put the kettle on and enjoy this easy-to-make, delicious treat …
_____________________________________________________________________________

 In a large bowl or food processor (which I prefer), mix or pulse together all dried ingredients: flour, baking powder, salt, sugar, lemon zest and lavender.
 Using your fingers or a fork, work butter into dry ingredients until just crumbly. If using a food processor, pulse 8 or 9 times.
 Whisk together egg, lemon juice and heavy cream and add it to the mixture. With a fork, bring together quickly. Do not overmix or scones will be heavy.
 Dump the mixture onto a lightly floured board. It will be a bit crumbly. Knead two or three times to bring the dough together. Again, do not overwork the dough.
 Shape into a round about 1/2″ thick. Cut the desired number of scones you’d like … in the shapes you’d like. Round. Triangular. Square. It’s up to you. I decided to be creative and cut mine to resemble a flower.
 Remove from the oven and cool on a rack. (Unfortunately, the angle of the photo doesn’t show how much they’ve risen.) For confectioners’ glaze, mix together four tablespoons confectioners’ sugar and 1 teaspoon milk. When the scones are cool, drizzle with confectioners’ glaze.
 How do you like my scone flower?
 Be sure to put the kettle on and have your cuppa ready because you’re going to want to dive right into these … well, at least, I did!
 Strawberries are sweet, delicious and good for you (full of antioxidants and very low in calories). And they are so versatile. You can just pop them into your mouth or use them in salads, smoothies and all sorts of desserts from ice cream to shortcakes. You can make jams, jellies and spreads, or dip them into chocolate. They freeze easily, and for some people, they are easy to grow. I, however, have been relegated to a “pick-your-own-fruit” farm where I “pick-my-own-strawberries”. Now, armed with 10 lbs. of strawberries and a three-day window before they start to lose their appeal, it’s time to get cooking.
 Dump the dough onto a lightly floured board and bring together into a round ball. Flatten the ball and gently roll it into an 10″ circle, about 3/4″ thick. To cut out the biscuits, you can use a knife and cut the dough into squares or use a biscuit cutter to cut out rounds. The size, again, is up to you. I like to make smaller ones … using two per serving.


 Put all the dry from the food processor into a large bowl, adding the nuts, and then, with a fork, stir in the pumpkin mixture. Work quickly mixing all the ingredients together until just blended. Do not overwork the dough or our scones will be heavy and tough.
 Dump the batter onto a lightly floured board. Knead lightly until smooth and form into a round or square shape.
 Then roll to a thickness about 3/4″ high and approximately 8″ in diameter. The shape will depend upon how you want to cut them. The batter should still be soft and sticky. By dipping the biscuit cutter or knife into flour after every cut, you avoid squishing the dough together. Try to make clean cuts, not twisting or turning the dough. Whether you cut the scones into rounds or triangles or squares is all up to you! If you have any scraps after cutting, reform the dough and continue making more.
 Transfer the cut pieces onto a parchment lined baking sheet by again dipping a spatula into flour and lifting from underneath. Try not to compress the dough or add too much pressure. Arrange the scones on the baking sheet about 1/2″ apart. They will rise while baking. Brush the tops of the scones lightly with melted butter and sprinkle with brown sugar. Then place the baking sheet into the refrigerator for at least 30 minutes (or more). Only then should you preheat the oven to 425°.


 The judges, Mary Berry and Paul Hollywood, somehow work beautifully together … a bit like Julia Child and Jacques Pepin. Paul, with his piercing blue eyes, would intimidate even the most seasoned baker. It just takes one look for you to know you’re doomed, but Mary (30 years Paul’s senior) finds some good in every bake, regardless of how awful it may look or taste. Both Paul and Mary are hugely successful professional bakers, cookbook authors, and television personalities, each with their own cooking shows; but there are no signs of egos here. Each week they bring interesting and quite difficult challenges to the contestants, after which they focus on the ‘bake’, nothing more. How refreshing!
 The baking “challenges” are divided into three categories. First , there is the Signature Bake, to test the contestants’ creativity and baking ability. Next is the Technical Bake, where the bakers receive a recipe from Mary or Paul with minimal instruction. Finally, it’s the Showstopper Bake, which is designed to display the bakers’ skill and talent. Many of these “challenges” are classic British baked items, some are from French patisseries … most of which I have never ever heard of (actually some of the contestants have never heard of them either). Yes, the contestants are given recipes in the Technical Bake, and, yes, they have advance knowledge of what the next challenge is going to be so that they can practice at home. What they don’t have to do is try to utilize canned chicken, root beer, squash blossoms and dill pickles to make a frozen dessert. This is a true baking show, remember. Gimmick free!


 hrough a strainer to remove the lemon zest, and any coagulated bits. I want to have all the zesty bits right in there, so I prefer not to.
 I did my research, downloaded the map, the schedule of events, and was ready. We took a drive to Bishop Auckland the day before just to get the ‘lay of the land’. I certainly didn’t want us to get lost, or not know where to park. As we drove along the highway into Bishop Auckland, the flashing signboards were up warning us to “expect delays” because of what was expected to be thousands upon thousands of foodies descending on the town. We talked to relatives who kindly offered their driveways, knowing that we’d be driving around for hours trying to find a spot to park the car.