
On our recent trip to Vienna, a slice of authentic SACHER TORTE was on the “must eat” list (along with schnitzel, sauerbraten, sausage, spaetzle, and pretzels) … at one of Vienna’s famous coffee houses, of course. Do I have your attention yet?
Vienna is world famous for its desserts, all of which are named after emperors, princes, princesses, operas, politicians, chefs, countries. Keeping these traditional names alive is a reminder of Austria’s tumultuous past. From 1273 with the selection of Rudolph as king, the Hapsburgs ruled over this entire Eastern European area, maintaining control for 640 years. After years of wars and takeovers, and the fall of Napoleon in 1815, the middle class of Vienna exploded. People emigrated to Austria from all the surrounding countries and Vienna became a bulging metropolis.
Cooks and bakers were now sought after, not only for the upper-class households, but the middle class as well. Prices for the transportation of coffee, sugar, flour, as well as their improved quality, made fine desserts available to everyone. Preferring to spend their money on culture, ‘the art of the baker’ became a cultural phenomenon. Now with so many people in the city, coffee houses started springing up everywhere, providing people with a place to get away from the crowds, sit down and relax.
 As gathering places for poets, academics and well-read citizens, who found their imaginations stimulated by the lively conversation, as well as, perhaps, by the caffeine, coffee houses were popular around Europe since the 16th century. In Vienna, however, coffee didn’t actually appear until the 17th century when Turkish coffee brewers introduced coffee to Vienna. By offering free ‘tastings’, the coffee merchants opened up a whole new world to the Viennese. Although Turkish coffee was rather bitter and unsweetened, the coffee house proprietors soon learned to serve the brewed coffee with hot milk or cream, and honey. This is how Viennese prefer their coffee to this day. Can you say “cafe latte”?
I will say, as a ‘tea drinker’, I was a bit skeptical about getting a good cuppa in a Viennese coffee house, but, I was not disappointed in the least! Served on a silver tray, in a proper teapot, with a lemon wedge and milk on the side, I couldn’t have been happier.
 Coffee, as well, is always served on a tray, with a glass of water on the side, and in finer cafes, a spoon balanced on the rim. The water is a holdover from the Turkish custom to show the customer that they could stay as long as they wanted. I think it may be because Turkish coffee can be a bit strong. But, needless to say, the Viennese coffee house experience is one to treasure.
I’m getting a little off track, this is a post about the world-famous Sacher Torte, after all. “Torte” or “torten” began as a cake made from ground nuts. Nuts were less expensive than flour made from wheat. Cane sugar was extremely expensive, and, until the technique of extracting sugar from beets was perfected, most tortes were made with honey. As a result, they were quite dense.
So, what is the story behind the world famous “Torte”? It begins in 1832 when Prince von Metternich wanted to throw a spectacular party, and asked his chef to create a new dessert. The Prince wanted something unique, ‘masculine’, not light and fluffy. The palace’s chef fell ill and wasn’t able to come up with anything. Now what was the Prince to do! A 16-year old second apprentice in the kitchen, Franz Sacher, stepped up. Deciding that ‘chocolate’ was one of the most ‘masculine’ flavors, he combined that with apricot preserves, and a glossy chocolate glaze.
The dessert was a sensation. As a result, Franz’s career as a pastry chef catapulted. He was in demand everywhere and ended up in Demel, the royal bakery to the emperor. From there, this torte was offered to the masses. Franz became very successful, saved his money, and eventually opened his own bakery (taking his recipe with him). Franz’s son, Eduard, followed his father in the food business and in 1876 opened a cafe/hotel. Eduard decided that his father’s dessert should be the trademark for his hotel. Demel disagreed and continued to offer the cake at their bakery, along with all the copycat tortes being made elsewhere.
After two wars, Viennese businesses had a very difficult time fighting back into the economy. Whatever business owners could do to boost brand identification of a product was welcome. The Sacher Torte was being made everywhere, but the Sacher family wanted control and decided to sue Demel over the right to use their name. The fight ended up in court for seven long years. The court eventually concluded that Franz Sacher’s original recipe was unique and the Sacher family was awarded exclusive rights to the name, “The Original Sacher Torte”, which allowed the family to place an official chocolate seal on each cake.
 Yes, you can purchase ‘Sacher-like’ tortes all over Austria, Germany and Budapest, but is it “The Original Sacher Torte”? The 14 bakers at the Hotel Sacher bake approximately 800 of these cakes a day. And, if you’d like to enjoy a slice at the Hotel, be prepared to stand in line for quite a while. For two days, we attempted it, but gave up and went across the street to a warm, cozy cafe. The “Original” is not only sold at the Sacher Hotel and Cafe, but at gift shops as well as the airport. Look for the ‘seal’ if you want the original.
 Surprisingly, this chocolate confection is not the moist, gooey chocolate cake that you may have become accustomed to. It is quite dense, with a combination of chocolate flavors, and a thin spread of apricot preserves between the two layers … and is always served with a dollop of whipped cream. The original recipe remains a secret, of course, locked away somewhere safe, but you can enjoy many imitations throughout Europe. And, maybe you’ll be more patient than we were and stand outside in line (for hours) just to enjoy a slice. I hope you get the opportunity!
___________________________________________________________________________


 Now lift the top of the cloth and allow the weight of the apples to fall forward. It will roll up into a log all by itself. Using your hands, press it together to seal.
 Brush the bottom seam with a little more butter and pinch the seam closed. Roll the log back onto the pastry cloth and use the cloth to slide the strudel onto a buttered baking tray, seam side down. Brush the strudel completely with the remaining melted butter. Bake in a preheated 375° oven for 30 to 40 minutes until golden brown and flaky on top.


 Well, the only one doing blueberry picking now is me. But that’s ok … it’s still an annual tradition. My recipe collection has grown from just pancakes and muffins, but I have to admit, they are still my favorites. Today, in addition to the big pot of blueberries gurgling away on the stove for jam, I’m making a Blueberry Galette. A Galette is a fancy name for a free-form French tart. In Italy, it’s called a Crostada. Same recipe … different name. And, honestly, nothing could be easier.
 In a small bowl, mix together the cornstarch, sugar, salt, zest and juice of a lemon. Pour over the blueberries and let sit while you prep the pastry.
 Leaving an inch or so around the perimeter, pile the blueberry mixture into the center. Fold up the edges over the dough, pleating and pinching where necessary. Again, do not give the blueberries a place to escape.
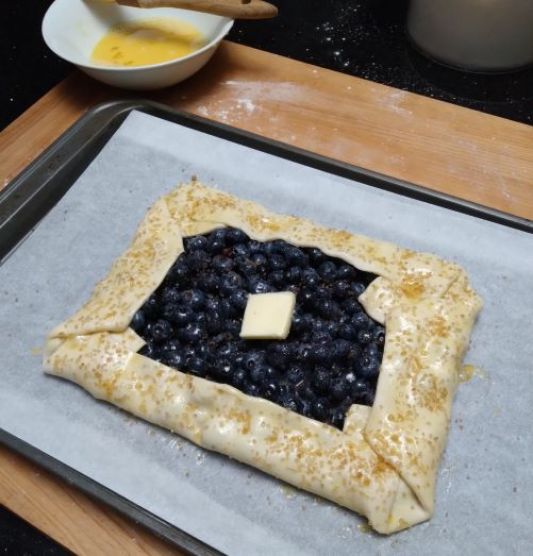 Brush the beaten egg over the edges. Sprinkle with Turbinado sugar (or plain sugar). I like the large crystals of the Turbinado sugar. It adds a bit of crunch. Place a pat of butter in the center. Bake in a hot oven for approximately 30 minutes. The crust should be nicely browned and the filling bubbly and hot.
 Let the galette cool for at least 15 minutes when you take it from the oven. I know you’ll want to dive right into it, but its worth the wait. Meanwhile, whip up some heavy cream or get the ice cream out of the freezer. This is soooooooo good!!

 * I used Old Fashioned oatmeal, which is very coarse. To break the oats down a bit, I pulsed the oatmeal for a few seconds in a food processor. If you use ‘fast cooking’ oatmeal, you don’t need to do this.
 Put the molasses, golden syrup, brown sugar, butter and milk in a saucepan and heat until the butter is melted. Then take it off the heat and cool until lukewarm. Beat in the eggs.
 Add the liquid ingredients from the saucepan to the dry ingredients. Stir in quickly and beat until the batter is smooth.
 Pour the batter into a greased 9″ x 9″ pan. Bake for 40 to 50 minutes or til it pulls back from the sides and is cooked through. A tester should come out clean from the middle. Cool in the pan for a few minutes and then turn it out onto a wire rack to continue cooling.

 To serve, I dusted on the powered sugar and a squeeze of lemon juice . . . folded the ‘pancake’ in half and then folded it over again . . . with another dusting of powdered sugar. Honestly, they were delicious!! But were they pancakes?
 He explained the different varieties of apple trees and their location in the orchard, handed us a couple of paper bags and off we went. Picking didn’t take long, as the trees were heavy with fruit … Empire, Macouns, Macintosh, Golden Delicious and Cortland … all red, ripe and ready. After picking … and eating as many as we could … we managed to find our way back to the shed, where the owner weighed our bounty and offered us a slice of pie. Pie? Yes, every day his wife bakes an apple pie for anyone who, after a day of picking, would like to sit, relax and enjoy a slice of homemade apple pie. Needless to say, it was one of the best apple pies we’ve ever had.
 Into a high-sided saucepan, place the entire can of sweetened condensed milk. Completely cover the can with water and bring to a boil. Then cover the saucepan and reduce the heat to a simmer. Let this simmer, covered, for at least two hours, while you make and bake the pudding. Check it every now and then to ensure the can is completely covered with simmering water. Refill water as needed.
 In a large frypan, over medium heat, melt the butter and add the cubed apples. Sprinkle on the dark brown sugar, the cinnamon, nutmeg and the cornstarch. Mix gently. Cover and let it cook down for about 15 minutes or until the apples are softened and a sauce forms. If needed, add a bit of water. Stir gently.
 While the apples are gently cooking, in a mixing bowl, beat the eggs and brown sugar. Add the melted butter and vanilla. Beat in the flour, cinnamon, salt and baking powder. Mix well, but don’t overbeat.
 Spoon the apple filling into the pudding batter. With a wooden spoon, gently mix all together. Then spoon the batter into the buttered ramekins. Not too high. They will rise a bit. Sprinkle with toasted nuts, if you’d like.
 Place the ramekins on the towel-lined baking pan. Then fill the baking pan with hot water until the water comes halfway up the sides of the dishes.
 Cover the entire baking pan tightly with foil and bake at 350°. Bake for 60 to 70 minutes (depending upon the size of the ramekins). No peeking. Puddings take a bit longer to bake than cakes.
 When done, remove the baking pan from the oven and let the puddings rest for 10 minutes. Meanwhile, take the can which has been bubbling away on the stove top, and holding it with a towel, carefully open it. It will be very hot. With a spoon, mix the thick, sweet sauce to smooth it out. Then spoon the toffee sauce into a serving bowl or pitcher.
 To serve, either pop the pudding out of the ramekin and plate it or serve it right in the ramekin … and spoon a generous dollop of toffee sauce on top. For a little extra treat, you might want to have ice cream or whipped cream on hand. This is an absolutely rib-sticking, old fashioned dessert, hearty, sweet and full of chunky apples with a creamy toffee sauce … perfect for a cool Fall evening. i hope you and your family enjoy it as much as we did!!
 magazine and newspaper clippings – with pictures, of course, so that I would know exactly what the finished dish was suppose to look like.
 Separate 8 large, room-temperature eggs … put the whites aside.
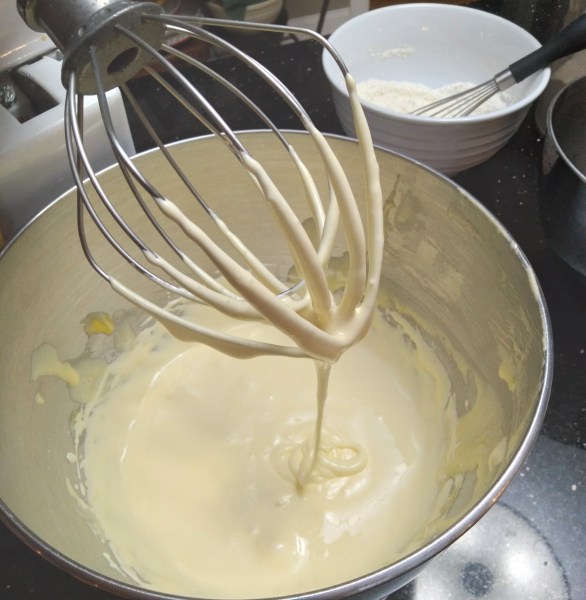 Beat the egg yolks until thick and lemony-colored. Gradually add 2/3 cup sugar. Beat until gloriously thick. Combine the freshly-squeezed orange juice (freshly-squeezed gives the best flavor) with the orange peel. Add this to the egg yolk mixture alternately with the cake flour. Set aside.
 Beat the egg whites with the cream of tartar and salt until the soft peak stage. Very gradually add the other 2/3 cup sugar. Beat on high until stiff peaks form … but do not overbeat. The egg whites should be stiff but not be dry.
 Gently fold the egg whites into the egg yolk mixture.
 Pour into the ungreased 10″ tube pan (or whatever pan you’d like to use). Angel food cakes do not need to be baked in a specific pan. Loaf pans are fine. Bake in a 325° oven for about 50 to 60 minutes.
 When done, a tester will come out clean, the sponge should spring back when touched and the color will be a delicate golden brown.
 Invert the tube pan to cool the cake. Yes, that is what the ‘feet’ are for. After approximately 20 minutes, the cake should easily come out of the pan. Turn right side up. Frost when cooled.
 Is it a “show stopper” as Mary would’ve liked to have seen? No … but I’m very happy with it. The cake is feathery light with just a subtle hint of citrusy orange. I made a quick seven-minute frosting and decorated it with candied orange slices.
 In another bowl, beat the eggs and sugar til light and fluffy. Add the additional wet ingredients and blend well. Yes, I added a bit of green food coloring for dramatic effect.
 Fold the dry ingredients into the wet ingredients and pour into a well-greased baking pan. A square pan, loaf pan, cake pan … it doesn’t matter. Bake time, however, will depend upon which pan size you use.
 Bake for 30 to 50 minutes (loaf pan will take longer – cake pan will take less). When a toothpick tested in the center comes out clean and the sides pull away from the pan, it is done.
 Be sure to put the kettle on and get your tea ready. The nutty texture from the pistachios combined with the perfume from the cardamom will warm your tummy and your spirits. If you want to splurge and add a scoop of vanilla ice cream and a dollop of whipped cream. Go right ahead! This is an easy-to-prepare, homey, quick cake (or bread) and, hopefully, you will love it as much as hubby and I. Happy sipping!!
 but I LOVE fruit cake. There I said it! And this Scottish classic is one of my favorites. Why? Because it is made with sweet, thick orange marmalade, giving it a wonderful orangey flavor. And to be an ‘authentic’ Dundee cake, the marmalade should be made with Seville oranges from Spain. If you’ve ever had the opportunity to visit the beautiful city of Seville, you can’t help but gaze in wonder at the over 40,000 orange trees which line the streets. At times, the trees are bursting with so much fruit, the streets are just littered with these brightly-colored orbs.
 How did the oranges end up in Dundee, Scotland? Because of a storm at sea! A Spanish cargo ship carrying goods and produce crashed into the rugged coastline in Dundee. Among the many goods on the ship were oranges. The oranges were ruined and couldn’t be sold, but a local merchant, James Keiller, bought the load at a discounted price. Keiller already sold jams in his shop and incorporated the oranges, fruit, pith and peel, into the recipe. Food historians say it was his mother, Janet Keiller, who then took the marmalade and used it in a fruit cake, now known as the Dundee cake.
 Other historians say the Dundee cake is attributed to Mary Queen of Scots in the 1500s who didn’t care for traditional fruit cakes with all the glacéd fruits and cherries. To please the Queen, her royal baker then made a cake which only had raisins, almonds and the bitter Seville oranges. But the timelines vary too much for me. The Dundee cake is made with orange marmalade which seems to have been created 100 years after Mary Queen of Scots would have enjoyed it. Although marmalade has been around since Roman times, it was almost always made with quince and honey, as a way of preserving the fruit. The name “marmalade” actually originates from the Portuguese word “marmelo” or quince. Believed to be the first published recipe for orange marmalade was found in a cookbook written by Eliza Cholmondeley in 1677.
 However this spice cake came to be, by the 19th century, the Dundee cake was served in tea rooms across Great Britain and was the dessert of choice for Winston Churchill and Queen Elizabeth II. As with many ‘historical’ foods, an application has been filed by Dundee bakers for protected status for this spice cake with the EU. The bakers’ hope is to keep this centuries old cake from becoming a cheap imitation of the original. Let’s hope the rights are granted.
 About an hour before you want to make the Gingerbread, combine the following ingredients in a saucepan: Cubed butter, vegetable oil, water, molasses, brown sugar, golden syrup or honey. Simmer over low heat until the butter is melted, the sugar has dissolved and everything is well combined.
 Cool completely before adding this mixture to the dry ingredients. It should be just warm to the touch. If you want to cool this mixture quickly, set the pan into a bowl of ice water.
 In a separate, smaller bowl, lightly beat together the eggs, milk and grated ginger.
 Pour the batter into the greased pan(s) and bake. Depending upon the pan size and shape, it could take between 45 and 60 minutes. Check for doneness when a tester comes out clean.
 Cool for 15 minutes before removing from the pan. Then put on the kettle and don’t be afraid to dive in. It freezes well if you want to wrap it tightly in foil. Or it will keep nicely in the frig for a week, wrapped in cling film.
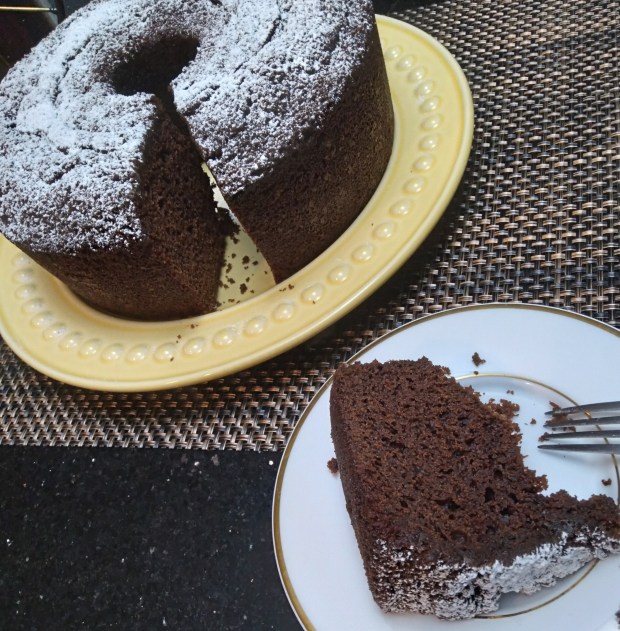 Dense, gingery and moist. I love this Gingerbread warm with a dusting of powered sugar and a big mug of tea! This is perfect for the holidays. Keep one on hand ready to serve for anyone who drops by … or just make to enjoy all by yourself!!