The “Teddy” Bear

I’m always curious about the origins of those things we hold dear.  One of those “things” that has always puzzled me is the ‘teddy bear’.  Where did our love for this small, stuffed, fuzzy animal toy come from?  Why the bear?   How did it get its name and how did it become the most popular, international cuddly toy ever sold?  For collectors, a vintage teddy bear can be worth more than $2 million!!  I have quite a few ‘teddies’ with which I would never dream of parting, but I doubt any of them have anything but a sentimental value.

Let’s start at the beginning and examine where the affection for stuffed animals as children’s toys came from.  Surprisingly, these cuddly, fuzzy replicas of animals originated in ancient times from a form of taxidermy.  Although the majority of animal skins were tanned and used for clothing, hunters have always taken great pride in preserving their kills.  Over time, taxidermists, as they became known, began to develop their skills, from just tanning the skins, to keeping the entire animal as intact as possible.  By the early 1800s, hunters began bringing their trophies to upholstery shops where a form of taxidermy took place, as upholsterers would actually sew up the animal skins and “stuff” them with rags and cotton.  Exotic “stuffed animals” became a hugely popular attraction and grew into quite a successful commercial venture, from traveling road shows to museum collections.  Not surprisingly, children became very attracted to these lifelike hunting trophies.  Observant entrepreneurs realized they could create a business producing toy “stuffed animals” just for children, and production for these adorable creatures began.

In 1897 in Germany, Margarete Steiff, was using techniques that she had learned from the upholstery industry, and began a small business creating soft, plush animal toys.  Richard, Margarete’s nephew, and a student at the School of Arts and Crafts in Stuttgart, was eager to help his aunt’s business and went looking for an idea for a new animal.  An American circus was touring through their city and, among the many animals on display, were performing bears.  Richard was fascinated by these lumbering creatures and, after the circus left, he began going to the zoo each day just to observe and sketch the bears.

Richard Steiff with his bear

Richard decided he would make a toy bear, but not just any stuffed bear, his would be jointed, similar to dolls and have the ability to stand up … and it would be made with fine mohair from goats.   Richard came up with a prototype … code name “Steiff Bär 55 PB” (“Bär” is German for “bear”, 55 = the bear’s height in centimetres; P = Plusch, plush; and B = beweglich, moveable limbs).

This fuzzy, mohair bear with its jointed limbs and brown eyes debuted at the German toy fair in 1903 where a buyer for a U.S. toy company not only bought all 100 bears, he placed an order for 3,000 more.  The next year, the Steiffs exhibited at the St. Louis World and sold 12,000 bears, receiving the Gold Medal, which was the highest honor at the event.  The Steiff bears became so popular, other companies quickly began manufacturing their own versions of this adorable toy animal.

Now let’s move to Brooklyn, New York, at about the same time, where Morris and Rose Michtom emigrated from Russia and opened a little candy store.  To attract more children to their candy shop, they began making soft, plush animal toys, which they strategically placed in their shop window.

Meanwhile, several thousand miles away, President Theodore “Teddy” Roosevelt, was in Mississippi to settle a border dispute.  While there, he was invited by the Governor and others to go on a hunting trip.  Hours had passed and although the other hunters had been successful in killing an animal, President Roosevelt still hadn’t shot anything.  His aides, after a long and exhausting chase with the hounds, cornered a young bear cub and tied it to a tree.  They then invited the President to shoot it.  As an avid hunter and outdoors man, the President couldn’t bring himself to shoot a defenseless little cub, saying it would be unsportsmanlike to kill a defenseless animal that way.  He ordered it to be set free, “Spare the bear! I will not shoot a tethered animal.”

Political cartoon by Clifford Berryman, The Washington Post, Nov 16, 1902

The incident generated national attention and was depicted in a popular political cartoon, titled “Drawing the Line in Mississippi” by Clifford Berryman.   Inspired by the cartoon, the Michtoms made a stuffed bear in honor of President Roosevelt.  They used the bear in Berryman’s cartoon as a guide, and quickly worked out a pattern.  On February 15, 1903, Morris put the stuffed animal in his shop window at 404 Tompkins Avenue in Brooklyn with a copy of the cartoon and a handwritten notice saying ‘Teddy’s Bear‘.

Not only did someone immediately enter the store to buy the bear, but 12 other customers also wanted to buy it.  The Michtoms didn’t want to offend the President by using his name without permission, so instead of selling “Teddy’s Bear” they mailed the bear to the White House and asked Roosevelt for the use of his name. The President replied telling them they were free to use his name if they wanted, but he doubted it would help with sales.  He was wrong.  Sales skyrocketed and because of the immense popularity of “Teddy’s Bear’s”, Roosevelt adopted it as their symbol in the 1904 election.  The Michtom teddy bears were placed on display at every White House function.

The Michtoms ultimately closed their candy store ad went on to start one of the most successful toy companies in the world, the Ideal Novelty and Toy Company.  The Ideal Novelty and Toy Company manufactured not only teddy bears, but many other very familiar toys as well.  You may have heard of the Betsy Wetsy doll, or Patti Playpal.  Perhaps you had a Tammy, a Thumbelina or Crissy doll?  Of course, everyone knows about the Rubik’s Cube.

So the world’s most beloved stuffed animal was, in fact, named in honor of President Theodore “Teddy” Roosevelt.  Who knew this adorable, little stuffed animal had such an interesting past?  Now more than a century later, Steiff continues to make stuffed toy bears, with its vintage teddy bears prized by collectors everywhere, commanding outrageously high prices at auctions.  Do you have one?

~ ~ ~ ~ ~
References:  Daily MailNewstrack, History, Theodore Roosevelt Assn., Toys and Games, Taxidermy, Toby Simkins, Wikipedia

_____________________________________________________________________________

STEAK AND MUSHROOM PIE

It’s all about the PIE in the U.K.  Whether it’s lunch time, tea time or a take-away, pies are everywhere … hot, warm, or cold … pork pies, steak pies, chicken pies, fish pies, even mixed veg pies.  Eaten at home, at a restaurant, or while walking down the street, the pie can be a complete meal, or just a snack.  From the pie shop to the butchers to the grocery store to Mom’s kitchen, everyone has their favorite and everyone loves their pies!!

We’ve just returned from England and the first thing hubby had to have while we were there was … a pie!  How many did he have during our week’s visit?  Too many to count.  Pies are English comfort food at its best.  I must say I do enjoy an occasional pie myself.  I’ve made them many times before, and have posted the recipe for, my favorite, Chicken and Leek Pie, but today it’s going to be the classic Steak and Mushroom Pie.  So, let’s get going!

I’m topping this pie with a puff pastry crust (yes, from the frozen food department of the grocery store).  You can top your pie with a short-crust if you’d like, or even a cobbler or biscuit topping.  It’s entirely up to you.  Whichever you choose, this is not a difficult pie to make at all.  Perfect for a cold Sunday afternoon.

STEAK AND MUSHROOM PIE
Stove top cooking for approximately 1-1/2 hours.  Preheated oven 400°F.  Bakes for approximately 25 to 30 minutes.  Serves 4 to 6.

2-1/2 lbs. chuck steak, trimmed and cubed
4 tablespoons flour
salt and pepper
2 or 3 tablespoons vegetable oil
1 lg. onion, chopped
2 lg. carrots, peeled and sliced
2 cups good beef stock
1 cup stout or ale
2 bay leaves
1 tablespoon tomato paste
1 pint button mushrooms, quartered
1 sheet frozen puff pastry, thawed
1 egg, beaten

In a large plastic bag, put the flour and 1 teaspoon salt and pepper.  Shake it about to incorporate.  Then add the cubed, trimmed steak.  Shake the bag to coat the steak evenly.

On the stove, in a large, heavy pot, heat the oil over medium/high heat.  Add a few pieces at a time of the coated steak to brown.  If you add all the steak at once, the oil temperature will cool down too quickly and the steak will just steam.  Take the seared steak out, put it aside and brown more.  After all the steak has been nicely seared, put the onions and carrots into the pot, reduce the heat a bit and cook til softened – about 5 minutes.

Put the browned steak back into the pot.  Pour in the beef stock (homemade or store bought), the ale (Guiness is perfect) and tomato paste.  Combine well and then add the bay leaves.  Taste to adjust the seasoning – adding salt and pepper as needed.

Cover tightly, reduce the heat to low and let simmer gently for about an hour.  After an hour, add the mushrooms.  Let simmer again for about 15 minutes, leaving the cover off or halfway (depending upon how much liquid is in the pot) and  taste again to adjust the seasoning.  Meanwhile, prepare the crust.  Roll the puff pastry out on a lightly floured board just a bit.  Don’t roll it too thin.  You want a nice hearty crust.

If you are making one casserole, then nothing else needs to be done – except for cutting a hole in the middle for the steam to escape while baking.  If you are making individual servings, as I did, then cut the pastry for the amount of dishes you are making.  I made six ramekins – so I cut the pastry into six pieces – with a hole in the center of each one.

Preheat the oven now.  From the pot, fill the casserole dish or dishes.  Around the rim of each dish, brush on the beaten egg.  Now fit the pastry crust onto the dish, pressing tightly around the edges.  Trim away any excess pastry.  (Next time, however, I am not going to trim the crust.  I’m going to leave it hanging over the sides – shrinkage does occur  : ).  Brush the top of the pastry with the beaten egg.

Place the casserole dish or dishes onto a baking tray – leaking can occur.  Place the tray into the oven at 400° and bake for about 30 minutes, or until the pastry is nicely browned.  When it’s browned, it’s ready!  Remove from the oven and eat!

This hearty beef stew with its rich gravy and buttery crust is soooo satisfying … a complete meal in itself.  Serve this pie with a side salad and crusty bread and you have the perfect comfort food for a cold winter’s night.


_____________________________________________________________________________

CHOCOLATE CHIP WALNUT BISCOTTI

It’s a cold, snowy Sunday in January.  What do you do?  Curl up on the sofa and read a book?  Maybe!  But, first how about baking a batch of delicious biscotti.   After which, curling up on the sofa with a piping hot mug of tea, yummy biscotti and a good book sounds like a perfect afternoon!

I didn’t post all the photos for the preparation and assembly for this recipe, primarily because they are the same as the photo instructions for my other biscotti recipe – White Chocolate Cranberry Biscotti.  Biscotti are really quite easy to make.  And, in most homes, not mine, properly stored, they can stay fresh for weeks.  Biscotti were actually created in Italy as a convenience food for travelers and the Roman army, rather than a sweet treat to go with coffee, tea and, of course, wine.  The “twice-baked” finger-shaped confections are “dried out” during the second baking in order to make them more durable.

Biscotti were originally flavored with almond, but now you can find biscotti made with dozens of flavors and combinations of flavors.   My previous recipe was White Chocolate and Dried Cranberry, but today I’m feeling like chocolate.  And to make these even more chocolaty, I’m adding mini chocolate chips to the chocolate batter.  Let’s go!

CHOCOLATE CHIP WALNUT BISCOTTI
Preheat the oven to 350°F.  Grease or line with parchment paper, two baking sheets.  Makes about two dozen.

1 cup all purpose flour
1/3 cup Dutch process cocoa
1/2 teaspoon baking powder
pinch salt
1 ounce softened butter (not melted)
1/2 cup packed light brown sugar
1 teaspoon pure vanilla extract
3 eggs, room temperature*
1 cup chopped walnuts (or any chopped nuts)
6 oz. pkg. mini chocolate chips

In one bowl, sift together the flour, cocoa, baking powder and salt.  I always sift twice, just to ensure the dry ingredients are incorporated completely.  Who wants to get a mouthful of baking powder??

In another bowl, beat the butter, sugar and vanilla til well combined.  Add the eggs, one at a time, beating well after each.  If the batter appears curdled at this point, don’t worry.  It will come together.

Stir in the dry ingredients, and then add the chocolate chips and chopped walnuts.  Cover the batter and then refrigerate for an hour.  It will be easier to handle when nice and cold.

Take the batter from the frig and dump it onto a lightly floured board.  Knead for a few seconds til it forms a ball.  Cut the ball in half.  Form each half into a narrow log – about 3/4″ high and about 6″ or 7″ long.  When baked, you will slice this log diagonally, so be sure it’s not too wide.

Place each log onto a baking tray and bake in the center of the oven for about 20 to 30 minutes.  Check for doneness with a cake tester inserted into the middle.  When cooked through, remove from the oven and cool on racks.

Only when completely cooled should you slice the logs.  If you are too impatient and slice them when they are still warm, they will crumble.  Using a serrated knife, cut each log on the diagonal, into about 1/2″ slices.  Place the slices on the baking trays, in a single layer.  Return them to the preheated oven and continue baking for about 15 to 20 minutes.  I flip them over halfway through the baking, but not everyone does.  It’s up to you.  When done, cool completely on racks.

These super chocolaty, crunchy biscotti are rich and sweet and delicious!  My suggestion … put a few away as a treat for yourself because these are going to disappear quickly.  Now you’re ready to curl up on the sofa with a good book and steaming, hot cuppa!!

~~~~
* People always ask me why should eggs be at room temperature for baking.  I’m sure with cold eggs, your bakes will be fine, but probably more dense than you might have wanted. With room temperature eggs, the whites and yolks combine easier, which means they will disperse into the batter more evenly, making for more even baking and lighter texture.  If you’ve forgotten to take the eggs out of the frig before hand, not to worry.  Place the eggs in hot (not boiling water) for 10 to 15 minutes and they’ll be perfect.

_____________________________________________________________________________

THE PANTO

When hubby told me we were going to the theater to see a Pantomime , I thought ‘how strange … a play done silently, without words, just using gestures and expressions’.  Well, I couldn’t have been more wrong.  In England, a Pantomime is anything but a silent, wordless production.  It is a bawdy, slapstick, over-the-top extravaganza geared to children, with most of the jokes just beyond the children’s grasp.

Pantomimes are traditionally children’s fairy tales, performed around Christmastime in small towns and large cities all over the U.K., for the whole family to enjoy.  Although they can be traced back to the middle ages, they really became popular in the 1700s in the theatres in Drury Lane.  The plot is the same … young love between an innocent, pretty girl and a handsome princely boy, a good queen, or a bad queen and a good or bad demon king, a maternal drag character in outlandish costumes, a clownish physical comedian, children characters, and a chorus of singers and dancers.  This all takes place, of course, in a ‘land far, far away‘.

The comedy is typical English … bawdy, slapstick and silly.  The musical numbers are always outlandish and geared to the local audience.  And, of course, audience participation is a very important part.  Where else can you “boo” the villain as he or she comes out on stage or shout out to the actors “look out he’s behind you” or “oh, no, you didn’t”.  Should you sit in the first few rows of the theater, be prepared to become part of the show.  At our production, the children loved the marshmallows being shot out into the audience, the water pistols, and rolls of toilet paper heading their way.  Where else can you find good, clean, slapstick fun today?

Our “Pantomime” was Snow White and the Seven Dwarfs … no, not Sneezy, Sleepy, Grumpy, Happy, Bashful, Dopey or Doc, with which you might be familiar, but rather The Magnificent Seven.  These seven actors were creatively costumed in black cloaks which hid the fact that they were traversing around the stage on their knees.  “Hi ho, hi ho, it’s off to work we go was replaced by the more topical “you lift us up”.  Yes, Snow White fell victim to eating the poisoned apple, only to be awakened by her one true love, Prince Charming.  But it was the evil queen who stole the show as she flew over the audience on a Pterodactyl.

Snow White and the Seven Dwarfs

We saw many other Pantos advertised during our travels in England this past week, from Jack and the Beanstock to  Cinderella, Aladdin, and Sleeping Beauty.  Pantomime is a thriving business in the UK. during the holidays, with large theaters competing to attract “star” names which, hopefully, will attract a sell-out audience.  And now I understand why.  These productions are a family tradition and children will remember them forever!

Should you ever get the chance to go to a “pantomime” don’t confuse it as I did.  It’s not a silent, gesture-filled production, it’s a bawdy, comedic, over-the-top, musical fairy tale!  And, please, don’t hesitate to go!!
_____________________________________________________________________________

MACARONS or MACAROONS?

This is the trendiest dessert/cookie to hit the food industry since probably Baked Alaska.  No, not the coconut “macaroon” you see in the grocery stores at Passover, I’m talking about the classic, tiny, ganache-filled French Macaron … pronounced with a short “O” like “on” not a looong “O” as in “une” … and made with ground almonds, not shredded coconut.

I first discovered this little, crunchy, chewy, filled confection quite a few years ago at a patisserie in London.  There were trays and trays of the pastel-colored cookies lined up in the window.  The colorful display and the exactness of each cookie was eye-catching to say the least.  The next time I saw them was a few years later at a wholesale food show in New York City, and buyers were standing in line to place their orders.  I stood in line too (not to place an order, but just to sample one).  A delicate, light, crunchy exterior with a soft and gooey interior … maybe one of the best little mouthfuls of sweetness I’ve ever had.  Fast forward to today and now these little confections are everywhere!!!  Not only on bakery shelves, but packaged macarons can even be found at Home Goods and Marshalls!  Really??

The Middle East should really be credited with giving us the origins of the macaron.  By the 1st century, they were exploring the culinary possibilities of adding honey, fruit and nuts to food, which resulted with almonds becoming their biggest export.  By the 7th century Persians were indulging in rich, luxurious cakes and pastries, made from these ground almonds called “marzipan”.  These treats reached Europe by the 14th century and it is actually Italians who created this little marzipan nugget.  The name “macaron” comes from the Italian word for paste which is “macaroni” (pasta is a paste made from flour, water and eggs).  I grew up calling pasta macaroni, didn’t you?

The cookies were produced in Venetian monasteries for centuries.  They were referred to simply  as “priest’s bellybuttons” because of the round shape.  You have to know that these cookies were rather plain in color and not sandwiched together as they are today.  In fact, the Italian amaretti cookie is also a ‘macaron’.  The differences are the amaretti is still not sandwiched together with a filling and is flavored with an almond liqueur.

The cookies remained an Italian treat until the Italian princess, Catherine de’ Medici, requested her pastry chefs travel with her to France to make these little delicacies which were to be served at her wedding to the future king of France, Henri II.  This all occurred in the 16th century, but the almond meringue cookies didn’t become popular until the 18th century when, during the French Revolution, two Benedictine nuns began making and selling the cookies in order to support themselves.  Sister Marguerite Gaillot and Sister Marie-Elisabeth Morlot became so popular they were referred to as the “Macaron Sisters” and the  village of Nancy in France has now dedicated a square to them.

The delicate, yet crisp meringue cookie stayed very traditional until 1930.  It was the brilliant idea of chef Pierre Desfontaines, grandson of the founder of the famous French Ladurée Tea Rooms, to elevate the cookie from its humble beginnings to what we know today.  Desfontaines quite simply decided to take the two cookies and sandwich them together with a ganache filling.  The tea rooms became the fashionable spot for London’s grand dames to gather, enjoying not only a pot of tea, but macarons as well.  Today Ladurée claims to sell over fifteen thousand cookies every day!

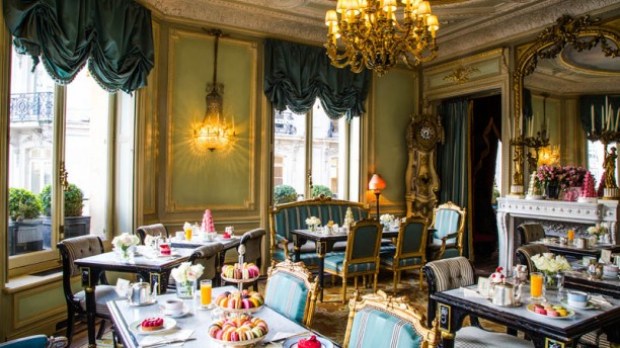
Have you ever been to Ladurée?  I have not (but I adore PAUL, their smaller venue).
Ladurée is definitely on my bucket list!!

The myriad of colors and flavors, shapes and sizes, available in shops today are never ending — from mint to chocolate chip, peanut butter and jelly, to lemon or peach, pistachio or strawberry cheesecake, salted pretzel, maple and, of course, pumpkin.  On and on it goes.  Every cafe in Europe has macarons on their menu, including McDonald’s in France and Australia.  If McDonald’s here in the U.S. sold macarons, I might even consider going.

Baking shows on the Food Network use the macaron as one of the ultimate baking challenges.  They can’t be that difficult to make, can they?  After watching an episode of Jacques Pepin’s cooking show, he made it appear so simple, using prepared marzipan (almond paste), beaten egg whites and sugar.  Mix it all together and pipe onto parchment paper, let rest and then bake.  Well, if Jacques Pepin says they are easy to make, then I’m going to give it a try.  And I have the perfect party coming up this weekend.  So here goes ….

~ ~ ~ ~ ~
References:  The Nibble, The Daily Meal, Culture Trip, WikipediaBon Jour Paris

_____________________________________________________________________________

PUMPKIN MUFFINS with CRUMB TOPPING

If “the muffin man” knew about these muffins, he’d still be in business today.  Dark, moist, spicy and absolutely delicious.  I’m pretty sure this easy-to-make recipe will become one of your “keepers” … and not just in the fall season.  The ingredient list might look long, but it is repetitive, so don’t be concerned.  You really don’t need that much at all.  And, if you bake, I’m sure you already have all these ingredients in your cupboard and frig.  If not, you might want to go shopping.

PUMPKIN MUFFINS with CRUMB TOPPING
Bake 375° 30 to 35 minutes.  Makes 9 to 12 (depending upon size).

1-3/4 cups all purpose flour
1/2 cup sugar
1/2 cup brown sugar
1 teaspoon baking soda
1/2 teaspoon baking powder
2 teaspoons ground cinnamon
1/2 teaspoon ground ginger
1/4 teaspoon ground allspice
1/2 teaspoon ground nutmeg
1/2 cup vegetable oil
1 15oz. can pumpkin (not pumpkin pie filling)
2 eggs, room temperature
1/2 cup milk

Topping
3/4 cup all purpose flour
1/4 cup sugar
1/4 cup brown sugar
1 teaspoon cinnamon
6 tablespoons butter, melted

Icing – optional
2 cups 10x sugar
1 tablespoons milk
3 tablespoons maple syrup

In a large bowl, combine the dry ingredients – flour, baking soda, baking power, salt, spices – whisk together til well blended and then set aside.  In another bowl, beat the oil and sugars, canned pumpkin, eggs and milk until smooth and well blended.

Mix the dry ingredients into the wet ingredients.  Don’t overbeat.  When completely blended together, spoon into paper lined (or greased) muffin pans.  Don’t overfill the muffin cups because you need to leave room for the topping.  Depending upon how large you’d like the muffins, you should get 12 good sized muffins.

In a third bowl, mix together the flour, sugars and cinnamon.  When well blended, add the melted butter and, with a fork, mix til crumbly.  Spoon this topping onto each muffin cup.  Press the topping down a bit so that it doesn’t fall off.

Bake in a preheated 375° oven for 30 to 35 minutes, or until a cake tester inserted into the middle comes out clean.  Remove from the oven and let them cool in the pan for about 10 minutes, then remove them from the pan and onto a rack.

In a small bowl mix the milk, maple syrup and confectioners sugar together until smooth.  Drizzle liberally over the tops of the cooled muffins.

That’s it!  Easy, peasy lemon squeezy!  Now go put the kettle on because you are definitely going to want a nice, hot cuppa with one of these moist, delicious pumpkin muffins.

_____________________________________________________________________________

JACK OF THE LANTERN

Halloween is fast approaching and the Jack O’Lanterns are everywhere!  It’s amazing to me how this holiday has grown from a simple childhood prank to the huge retail and celebratory event it is today.

The most iconic image associated with Halloween is, of course, the Jack O’Lantern.  But, did you know how these sometimes simple, sometimes elaborately carved pumpkins became associated with the holy day of All Hallow’s Eve or Halloween as it is known today?  There are many holidays in which religion seems to have collided with pagan symbols or icons to come together as one.   What does the Easter bunny, eggs and baskets have to do with the resurrection of Christ?  What does a tree adorned with lights have to do with his birth?  I find the marriage of these iconic images fascinating.

So how did an illuminated, carved pumpkin become associated with the celebration of Halloween?  It’s a long story, let’s start with All Hallow’s Eve …

Many of our holidays originated back when people celebrated the most important event of their life, the harvest.  For Americans, Thanksgiving is the biggest ‘harvest holiday’ celebration.  But in Argentina in February, it is the blessing of the grapes.  In June Bali celebrates the blessing of the rice harvest and in Greece it is the blessing of the sea.  For the Celts who lived in Ireland 2,500 years ago, it was November 1st, their New Year, or the Samhain (pronounced ‘sow-in’).   Not only did this day mark the official day of ‘harvest’ it signaled the end of summer and the beginning of the dark, cold winter.

The shorter days and long, dark nights were eerie and forboding to the Celts, and often associated with death.  They believed that on the “eve” before the new year, the line between both worlds opened up and the ghosts of the dead would return to earth.  These ghosts would cause chaos, destroying crops and endangering the harvest.  To ensure the safety of the harvest, the night before the New Year, Celtic priests, the Druids, would build bonfires and make sacrifices to the Gods.  The villagers would often wear animal heads and skins, dance and tell fortunes to ward off the evil spirits.

Meanwhile, in Rome many years later, Pope Boniface IV established the feast of ‘All Martyr’s Day’ on May 13th to honor all Christian martyrs.  Later Pope Gregory III expanded this festival to include not only martyrs but saints as well and he moved the observance from May 13th to November 1st.  Hmmm, have we not heard that date before?  With Christianity spreading throughout the Celtic lands, it wasn’t long before the church attempted to replace the Celtic festival of Samhain with a church-approved holiday.  As has happened throughout history, the Christian holiday (‘holy day’) eventually merged with the Pagan celebration, with bonfires, parades, and dressing up as saints, angels or devils.

But, wait!  How does a carved pumpkin fit into all this?

Celtic legend says that a very, very frugal man, ‘stingy’ you might say, used to frequent the pubs in his Irish village, but when it came time to pay for his pint, he always had a convenient excuse for not being able to pay up.  Yes, his name was “Jack”.  One evening stingy ol’ Jack tricked the devil himself into paying his tab in exchange for Jack’s soul.  But when the devil demanded his payoff, Jack reneged and before the devil could do anything about it, Jack died.

Jack wasn’t allowed into heaven … and the devil wouldn’t allow him to enter hell.  His soul was cast out into the night with only a burning coal to light his way.  Jack hollowed out a turnip and placed the burning coal inside … left to wander the earth alone, especially on All Hallow’s Eve.

To honor Jack, the Celts hollowed out turnips and created their own lanterns … the ‘Jack of the Lantern’.  And when the people, often children, would go door-to-door during All Hallow’s Eve to pray for the dead and, hopefully, be paid with soul cakes, they would carry their carved Jack O’Lanterns to light the way.

Jack o’ the lantern! Joan the wad,
Who tickled the maid and made her mad
Light me home, the weather’s bad.

You may learn otherwise about the origin and history of the Jack O’Lantern, but how could you not love this legend.  Although carved gourds have been used in many countries around the world, the Irish are credited with creating these ghoulish creatures, used primarily to ward off harmful spirits.  When the Irish emigrated to the New World, they brought the tradition with them, eventually replacing turnips with Pumpkins.

Happy Halloween everyone!
_____________________________________________________________________________

~ ~ ~ ~ ~
References:  Encyclopedia Brittanica, History, Wikipedia, Wikipedia II, Instructables

THE MUFFIN MAN

Do you know the muffin man … the muffin man … the muffin man?  Well, if you mean the one who lives on Drury Lane … Yes, I know the muffin man!   I am dating myself now, quite certainly, by recalling this childhood song.  I doubt any millennials can sing it, or have ever heard of it.  But one thing I do know is that I love English muffins.  Doesn’t everyone?  Splitting an English muffin in half, toasting it and spreading it softened butter and jam has to be one of the best breakfasts I know of … although they weren’t originally intended to be eaten that way.

In America we think of ‘muffins’ s as small hearty, cake-like breakfast items, which may or may not be made with fruit and nuts.  These are not to be confused with English muffins, which we sometimes call “crumpets”.  Although both did originate in England and both are griddle cakes, technically, a “crumpet” is a bread-like dough using baking powder as its leavening agent, while “muffins” use the same bread-like dough but with yeast as its leavening agent.  Also, crumpets are meant to be eaten without slicing open … muffins are sliced open.  Confusing, I know.

If you’ve watched Downton Abbey, or Upstairs Downstairs, you know that all wealthy aristocratic families had their own kitchen staff which, depending upon the size of the household, included cooks and bakers.  The “muffin” or “crumpet” originated from the leftover dough the bakers would be baking that day.  He or she would take the leftover bits, roll them up into a ball, flatten them and toss them onto a hot griddle.  These would then be enjoyed by the “downstairs” staff at tea time.  These crusty morsels were such a tasty hit, the “upstairs” family wanted them too.  It wasn’t long before these bready treats were also being served “upstairs” at tea time.

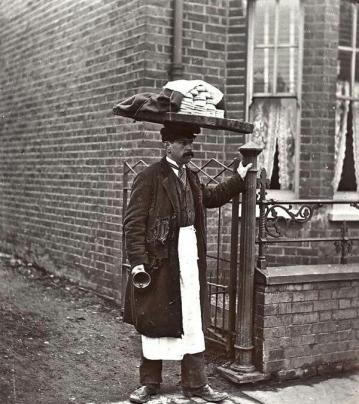
The word quickly spread about these delicious, small, round grilled rolls.  And soon bakers everywhere were making them and peddling them on the streets to the working classes.  At that time it was far too dangerous for city homes and apartments to have an indoor working oven.  As a result most people could not do their own baking.  So this inexpensive bread roll became an easy breakfast to grab and go while on the way to work.  Early in the morning, on the streets of London, with a wooden board balanced on his head and a bell in hand, the “muffin man” would walk up and down the “lanes” ringing his bell to signal his arrival.

And now that we know who the muffin man was, let’s make some muffins!  I’m using British bread baker, Paul Hollywood’s recipe.  Not quite sure how they are going to turn out, but let’s have fun trying.

ENGLISH MUFFINS
Makes 8 to 10 good-sized muffins.  Prep time:  about 2 to 3 hours.

2-1/3 cups white, bread flour
1 tablespoon active dry yeast
1 teaspoon salt
1 tablespoon sugar
1 tablespoon softened butter
1 medium-sized egg at room temperature, beaten
2/3 cup milk, warmed
vegetable oil
corn meal

This makes a VERY wet, soft and sticky dough and can be tricky to handle.  Should it get too sticky while kneading, let it rest for ten minutes.  The gluten will relax and then go back to kneading.

In a large mixing bowl with a paddle attachment (or by hand), mix all the dry ingredients together.  You may want to dissolve the dry yeast in the warmed milk, or not.  It’s up to you.  If you dissolve the yeast in the warmed (not hot) milk, it will shorten the proving time a bit.

Add the milk (yeast mixture), beaten egg and softened butter.  Beat all the ingredients together until smooth, glossy and the dough has formed a ball.  Turn the dough out onto a lightly floured board and let it rest for ten minutes.

After ten minutes, begin kneading.  It  will be STICKY.  Don’t add more flour or you will change the structure of the dough.  Continue kneading (scraping the board if necessary) until the dough has stopped sticking and is smooth and shiny.  This will take about 15 minutes.

Place the dough into a lightly greased bowl, cover with plastic wrap and put it in a warm place to double in size.  If you want to make the dough at night to cook in the morning, just place the dough into the refrigerator.  This will slow down the proving process.

When the dough has doubled in size, tip it out onto a lightly floured board which has been dusted with corn meal.  Roll the dough out like a pizza to about 1″ thick.  Using a biscuit cutter, dusted with flour (or tuna fish can, which is what I use), cut out the ‘muffins’.  You should get between 8 and 10.

Place the muffins onto a parchment lined sheet which has also been dusted with corn meal.  Cover the muffins lightly with plastic wrap and let them rest for about 30 minutes.

Preheat a stove-top griddle over medium heat.  Lightly oil the griddle.  If you prefer to oven bake them, preheat the oven to 350° and use a heated pizza stone.  When the griddle is ready, toss the biscuits onto the surface and cook them for about 10 minutes or more on each size, depending upon the thickness of the muffins.  Baking will take about 25 minutes (flipping them over half way).

When done, move them to a wire rack to cool.  Then put the kettle on, get the butter and jam.  Slice one open and lash on the goodness.  You deserve it.  Honestly, once I realized how to work with such a sticky dough, they were quite easy.  Now they are going to be a weekly treat … perfect for a weekend breakfast.

Ella Fitzgerald can even make this little ditty sound good.  Listen ……

~ ~ ~ ~ ~
References:  Kitchen Project, The Foodies Companion, Bread Through History, BBC Food

_____________________________________________________________________________

Mother’s Milk

I am the grandmother of yet another grandbaby … which number it is, honestly, I’ve forgotten.  All that matters is each one is perfect and I love them all.  Their name, however, may occasionally slip away from me (but just for a moment).  While visiting with the new Momma recently, it was necessary to reassure her that she’s doing ‘a wonderful job’ and, ‘yes, it will get easier’.   It was quite fascinating to discuss how many beliefs, ideas and customs have changed since I had my first baby (some 50 odd years ago) to today.  From swaddling to breast feeding to when to introduce solid foods – on and on.  Today, the issue at hand was ‘breast feeding’ … and not necessarily ‘should I or should’t I’, but how there was a time when it wasn’t an issue to be decided by the new mother at all.  Doctors discouraged it, opting instead for the “modern and scientific” way to nourish your newborn … “formula”.

When I think of it now, why was this manufactured substitute for mother’s milk the recommended method and why was it referred to as “formula”.  A name which has stuck to this very day.   Did a marketing genius decide the name “formula” would comfort the then new mother who only wanted to give her newborn all the nutrition and love it needed, or was it just a tag name that ‘stuck’.

It really wasn’t that long ago when, if a new mother did not have milk to nurse her newborn, or did not survive childbirth, there were very few choices.  In Israel, 2000 BC, breastfeeding was considered a religious obligation.  Wet nurses were not only practical, but necessary, and in biblical times, held in very high esteem.  From an Egyptian medical encyclopedia, 1550 BC …

“To get a supply of milk in a woman’s breast for suckling a child:
Warm the bones of a sword fish in oil and rub her back with it.
Or: Let the woman sit cross-legged and eat fragrant bread of 

soused durra, while rubbing the parts with the poppy plant
.” 

A recent scene from the PBS program, Queen Victoria, showed Lehzen, Queen Victoria’s secretary, interviewing new, lactating mothers from the village to see who had the largest breasts and could possibly nurse the future heir to the throne for the soon-to-give-birth Queen.  Queen Victoria was never interested in breast feeding any of her nine babies, so a “wet nurse” had to be found for each of them.

The scene was actually quite disturbing when you consider that should the lactating new mother be chosen she would have been required to give up nursing her own infant in order to be available at a moment’s notice to feed the infant of the Queen.  Queen Victoria was not alone in her decision.  For many aristocratic women of those times, this was quite a common occurrence.  Because of the necessity of wet nurses, for some poorer women, it was actually a means of providing an income for their families … yes, a career choice.  But by the early 1900s, with the introduction of modern and scientific ways to feed infants, the career of wet nursing had pretty much disappeared.

Although feeding bottles of one sort or another had been in use in every culture since the beginning of time, it wasn’t until the 19th century when Elijah Pratt invented a functional and successful rubber nipple so that orphaned newborns could “latch” on simulating a mother’s breast.  Now the problem was what to put into those bottles that didn’t result in so many infant deaths.  They needed a “formula”.

Obviously, animal milk (cows, sheep, goats) was the most common source of replacing mother’s milk but nutritionally, it was inferior to breast milk.  In 1865 a German scientist,  Baron Justus von Liebig, suggested that if foods consisted of protein, carbohydrates, and fats, couldn’t these nutrients then be combined to replicate mother’s milk?  He did not challenge the idea that mother’s milk was the perfect food for an infant, but rather he claimed he had succeeded in concocting an emergency food, a “formula”, whose chemical makeup was identical to that of mother’s milk.  Two years later, the Baron introduced “Liebig’s Soluble Food for Babies” to the European market and by the next year it was being manufactured and sold in London by the Liebig’s Registered Concentrated Milk Company.


Many doctors began proclaiming these “formula foods” (which consisted of dried cow’s milk, wheat malt flour, and potassium bicarbonate) to be superior to the milk of wet nurses.  With the Industrial Revolution now well underway and many women in the workforce, it’s easy to understand how this now “doctor recommended” infant formula food became so appealing.  Unfortunately, with the lack of necessary nutrients missing, “formula” fed babies did not thrive as babies nourished with mother’s milk.

Baby “formulas” continued to be improved and, with the introduction of evaporated milk in the 1910’s, began to be widely commercially available.  Milk corporations began funding clinical studies which suggested that babies fed with evaporated milk formulas thrived “as well as breastfed babies”.  Soon there were dozens of companies manufacturing these products.  The best known of which was Nestle.  Nestle’s advertisements said it was better for babies than milk, for “impure milk in hot weather is one of the chief causes of sickness among babies.”  Their most effective marketing campaign was giving away free samples.  Another company, Mellin’s, combined this offer with free handbooks on proper infant care.  Not only did these handbooks convince new mothers of the reasons to feed their infants “formula”, they convinced many doctors as well.

By the 1940s, bottle designs had also improved, from those which lay flat with openings on either sides, to those which stood up straight, each with detachable rubber nipples.  Whatever the design, they were becoming very popular, and by the 1950s, the U.S. and Britain welcomed the introduction of heat-resistant upright Pyrex bottles.  These newly-improved, hygienic bottles could be sanitized, adding another layer of safety for newborns.

The aggressive marketing of “formulas” in not only the U.S. and Europe, but in developing countries as well, contributed to a global decline in breastfeeding.  This decline generated negative publicity for many manufacturers of baby “formulas”, and beginning in the 1970s, the movement to promote breastfeeding began.

The controversy of whether to feed your baby naturally or with “formula” was not my intent.   My intention was merely to examine the original question of why do we call this alternative food for mother’s milk “formula”  and why was I never given the choice of whether to nurse my babies or not.  I think I’ve found the answers.

~ ~ ~ ~ ~
References:  Food Timeline, Alimentarium, Domestic Geek Girl, The Journal of Perinatal Education,

_____________________________________________________________________________

(MOCK) APPLE STRUDEL

I am continuing in what appears to be my “mock apple” series of desserts.  Yes, this uses zucchini and, yes, no one will ever know.  From all appearances this is a classic strudel, rich, fruity and delicious.  It just doesn’t have apples in it … which actually makes it more fool proof.  One of the problems I have with making apple desserts, such as strudels or turnovers, is that the apples can sometimes cook down too quickly and become mushy, making for ‘soggy bottoms’.  Zucchini stays firm for that right amount of crunch.

If you are still picking zucchini from your garden at the end of September, as I am, please give this recipe a try.  I know its a bit time consuming, but well worth it!   So, gather all your ingredients and prepare to make something your friends and family will be wow’d by!!

MOCK APPLE STRUDEL
6 cups zucchini – peeled and diced
1 lemon, juiced
1 cup white sugar
1/2 cup brown sugar
1/4 teaspoon salt
1 teaspoon cinnamon
1/4 teaspoon nutmeg
1 tablespoon cornstarch
1/2 cup raisins
1/2 cup chopped walnuts
2 cups fresh bread crumbs (not packaged seasoned)
1/2 cup melted butter
1 egg, separated (white only)
1 package frozen puff pastry dough, thawed

Line a large baking sheet with parchment paper.  Preheat oven to 400°.  The strudel bakes for 30 minutes or til golden brown and cooked through.

In a large saucepan over medium heat, add the peeled, chopped zucchini.  Add the lemon juice, white sugar, brown sugar, cinnamon, nutmeg and salt.  Cook til softened – about 15 minutes.  It will bubble up and appear very syrupy, add the cornstarch and continue cooking until very thick – about 5 more minutes.  Remove from the heat and add the raisins.  Set aside while you toast the bread crumbs.

Using old stale bread, toss it into your food processor or blender and shred it up.  You’ll need about 2 cups of bread crumbs.  In a saute pan, melt a half stick of butter (1/2 cup) and then add the bread crumbs.  Toast lightly til brown but not burnt.  Then set those aside.


From the frig, get a package of thawed puff pastry dough.  On a floured board, roll out one sheet of puff pastry until its  v-e-r-y  thin.  Yes, thinner than you think it can handle.  It won’t break apart.  Keep flouring and moving the pastry sheet around so that you can work with it.  I was able to get it 25″ long.  How about you?

Now working from about 3″ in from the long edge, spread the cooled, toasted bread crumbs, about 4″ or 5″ wide.   On top of the bread crumbs, sprinkle the chopped walnuts.  On top of the bread crumb/walnut mixture, drop spoonfuls of the thickened zucchini/raisin mixture.  Spread it out as smoothly and evenly as possible.

Now comes the fun part.  Pull the 3″ swath of pastry that you left without filling, up over the filling.  Press down.  Don’t be afraid.  It will work.  Fold each side in and over the filling – about 1″ or less.  Now put your hands under the filling (which has been rolled once) and roll that over onto the pastry.  Press down.  Now do it again.  You should be able to roll the pastry at least three times, resulting in a long, cylinder of filled pastry.

Lightly beat the egg white and brush it onto the open edge to seal everything.  Press it into the pastry roll tightly.  You don’t want anything leaking out.

Carefully pick up the strudel and lay it onto the parchment paper.  Don’t be alarmed if your strudel doesn’t fit onto your pan.  Forming a horseshoe shape is traditional.  Brush the top with the remaining egg white.  Put the strudel into the refrigerator to cool while you preheat the oven to 400°.

When the oven is ready, put the strudel into the center of the oven to bake – approximately 30 minutes.  Check it quickly at 20 minutes to make sure its baking evenly.  Turning the pan may be necessary for even baking.

When baked, cool the strudel on a baking rack.  It may be necessary to use two spatulas to lift it.  I know you’ll want to dive right in, but let it cool a bit.  Trim off the end pieces and then serve it up … warm with a big scoop of vanilla ice cream!   Rich, fruity, flaky … this is delicious!!!

~ ~ ~ ~ ~
_____________________________________________________________________________