Christmas Pudding is deep, dark and dense. This moist, sweet dessert is stuffed with dried fruits and nuts, and served with a rich, creamy sauce. Much like a fruitcake, Christmas Pudding is one of those ‘love or hate’ desserts. In our home, we love it! And it’s the season, or at least it will be in a very short time, and my hubby couldn’t enjoy Christmas without it. To be clear “pudding” in England is not defined as the sweet, dairy dessert we have here in the States. Although “puddings” in the U.K. are usually served at the end of the meal, they can be sweet or savory, and can also be encrusted in a pastry shell … or not.
Originating in medieval times, Christmas Pudding known then as Plum Pudding or Figgy Pudding (for some reason all dried fruits were either called “plums” or “figs”), still holds true to those medieval roots. To preserve fruits, they were dried … animal fats were also used as a means of preserving foods … and spices were used to cover up the taste of rancid foods. Yummy! Cooking appliances, of course, were very limited. An open hearth was about all you had where you could set a boiling pot or skillet.

The beloved Queen Victoria and Prince Albert adored Christmas and all things traditional. A grand, flaming “Plum Pudding” always took center stage on their table. Perhaps that is one of the reasons why this sweet, dense dessert is still seen on tables all around the U.K.
Christmas Puddings or Plum Puddings are certainly available to purchase. You can find them in the international aisles in most grocery stores and you can certainly find them in British import stores. They can be a bit pricey, but if cooking is not your ‘thing’ or you don’t have time, be sure to pick one up. They are delicious!
Now it’s time to make my Christmas Pudding. As with every traditional recipe, each family or region has their own version. To write down exactly how much of what ingredient is almost impossible. Both my grandmothers, who were very good cooks, could never tell you “exactly” how much to use of any recipe. It was always a pinch of that, or a handful of this. That’s pretty much what this old-fashioned pudding recipe consists of … a pinch of this and a handful of that.
Although this pudding can be made and served the same day, it does much better when made two to three weeks in advance to allow the flavors to deepen. When you are ready to make the pudding, you do need to plan your day. This will require 5 to 7 hours of steaming on top of the stove. The larger the pudding, the longer the steaming time. It was the style during Victorian times to use grand, ornate molds to steam the puddings. Not having one, I used a bundt pan, making one large pudding, which required 7 hours of steaming.
Adding a gold coin for good luck in the coming year has become a tradition in some homes. If you are going to add a coin or a charm, be sure it has been thoroughly cleaned. Lastly, the pound of dried fruits can consist of any combination of fruits you like. I used 1/4 lb. each of sultanas, pineapple, mango and prunes. Mix it up and use whatever you like.
Now have a go!
CHRISTMAS PUDDING
You will need to know how many you’re going to make … one large, two or more? Be sure the bowls or molds are heatproof and can fit into your covered pot. You will also need parchment paper and aluminum foil.
- ¾ cup rum or brandy or vodka or sherry
- 1 pound of mixed dried fruits – currants, golden raisins, sultanas, pitted prunes, dates, apricots, pineapple, mango, candied peel, glace cherries, etc. Any assortment will do.
- 8 oz. melted butter
- ¾ cup dark brown sugar
- 3 large eggs
- 2 tablespoons honey
- zest and juice from one orange
- 1 cup all-purpose flour (more or less)
- 2 ½ cups fresh breadcrumbs
- ½ teaspoon ground cinnamon
- ¼ teaspoon ground nutmeg
- ¼ teaspoon ground cloves
- ½ teaspoon ground ginger
- 1 teaspoon baking powder
- 1 cup chopped nuts, walnuts/almonds/pecans (optional)
- Grated rind and juice of one orange
- ½ cup vodka (to flame the pudding)
 Cut the pound of dried fruits up into even-sized pieces. Kitchen shears or scissors is the easiest way to do this. Make sure all the pieces are about the same size.
 Put the mixed fruits into a bowl and pour the liquor over. Mix well, cover and let steep overnight or up to a week. I used a sweet liquor made from the tamarind fruit. Soooo good!
 The next day, or later that same day, combine the dry ingredients and spices in a small bowl. In another bowl, mix together the brown sugar, orange peel, orange juice, honey and melted butter.
 Beat in the eggs one at a time. The batter will appear to have curdled. Not to worry. Add the dry ingredients and mix well.
 When combined, add the steeped fruits and nuts and mix to combine thoroughly. If the batter is too wet, add more flour. Now you can add the “lucky charm”. Put a large pan of water or steamer on to boil. Place a saucer in the bottom to keep the pudding mold from touching the bottom of the pan. Generously grease the pudding mold(s).
 Pour the batter in the prepared mold or bowl, pressing the mixture down and tapping it to get rid of any air bubbles. Then wrap it with a layer of parchment paper and foil so that it is completely watertight. It will rise a bit and needs room at the top.
 It’s also important to trim away any excess parchment paper and foil. You don’t want any steam traveling into the mold and making your pudding soggy.
 Put a small plate upside down inside the pan to keep the mold/bowl from touching the bottom of the pam. Then place the mold into the pan of water. The water should come at least halfway or more up the side of the bowl or mold.
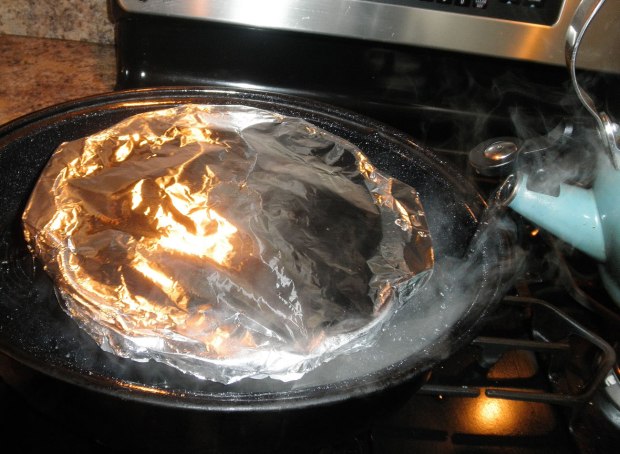 Bring the water to a boil, cover tightly and steam for 5 to 7 hours, checking every now and again to make sure the water hasn’t bubbled away. The longer you let it steam, the darker it will get. After 5 to 7 hours, remove the mold carefully and let it cool completely. Discard the paper and foil and rewrap with fresh. Store in a cool, dry place or the refrigerator for up to four weeks.

I can’t show you a photo of the finished product because this pudding is getting wrapped up and going into the frig for a couple of weeks. It’s not Christmas yet!! But when you are ready to serve, put the pudding (still in its mold) and still wrapped tightly into the pot to steam again, for about an hour just to reheat.
~ ~ ~ ~ ~ ~ ~

This isn’t my pudding, but I’ll replace this photo at Christmas with my own! Thank you “living the pie life”.
To serve it, remove the mold from the pan, remove the lid, put a large plate on top and turn it upside down. Give the mold a little tap to help it out. Decorate the top with a sprig of holly. Then bring the pudding to the table while you heat the brandy, rum or vodka in a small pan until its very hot, but not boiling. Pour the liquor over the pudding at the table and light it. So impressive! Be sure to serve it with an Eggnog Cream, Brandy Cream or sweetened whipped cream.
~ ~ ~ ~ ~ ~ ~
References: History of Christmas Pudding, Livin the Pie Life, English Christmas Cakes
_____________________________________________________________________________

 In a large bowl, combine the dry ingredients – flour, baking soda, baking power, salt, spices – whisk together til well blended and then set aside. In another bowl, beat the oil and sugars, canned pumpkin, eggs and milk until smooth and well blended.
 Mix the dry ingredients into the wet ingredients. Don’t overbeat. When completely blended together, spoon into paper lined (or greased) muffin pans. Don’t overfill the muffin cups because you need to leave room for the topping. Depending upon how large you’d like the muffins, you should get 12 good sized muffins.
 In a third bowl, mix together the flour, sugars and cinnamon. When well blended, add the melted butter and, with a fork, mix til crumbly. Spoon this topping onto each muffin cup. Press the topping down a bit so that it doesn’t fall off.
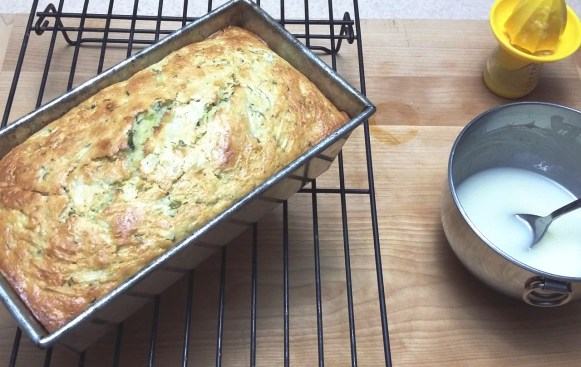
 In a small bowl mix the milk, maple syrup and confectioners sugar together until smooth. Drizzle liberally over the tops of the cooled muffins.

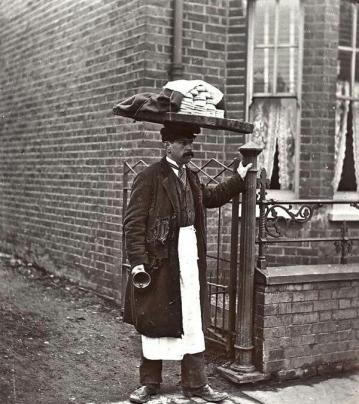 The word quickly spread about these delicious, small, round grilled rolls. And soon bakers everywhere were making them and peddling them on the streets to the working classes. At that time it was far too dangerous for city homes and apartments to have an indoor working oven. As a result most people could not do their own baking. So this inexpensive bread roll became an easy breakfast to grab and go while on the way to work. Early in the morning, on the streets of London, with a wooden board balanced on his head and a bell in hand, the “muffin man” would walk up and down the “lanes” ringing his bell to signal his arrival.

 In a large saucepan over medium heat, add the peeled, chopped zucchini. Add the lemon juice, white sugar, brown sugar, cinnamon, nutmeg and salt. Cook til softened – about 15 minutes. It will bubble up and appear very syrupy, add the cornstarch and continue cooking until very thick – about 5 more minutes. Remove from the heat and add the raisins. Set aside while you toast the bread crumbs.


 Lightly beat the egg white and brush it onto the open edge to seal everything. Press it into the pastry roll tightly. You don’t want anything leaking out.
 When the oven is ready, put the strudel into the center of the oven to bake – approximately 30 minutes. Check it quickly at 20 minutes to make sure its baking evenly. Turning the pan may be necessary for even baking.


 Puff Pastry has layers of butter incorporated within the pastry, which when baked, causes pockets of steam to form in the dough. The dough then separates into flaky layers. Phyllo needs oil or melted butter brushed onto each pastry layer before baking, usually requiring three or more layers, it then becomes tender and flaky.
 Spread the chocolate (or Nutella or even peanut butter, if you’d like) over the entire sheet of pastry. Sprinkle evenly with chopped nuts.
 Now its time to preheat the oven to 400°. Take the rolled pastry out of the refrigerator and place it onto a cutting board. Cut into slices about 1/4″ to 1/2″ thick. It’s entirely up to you. The thicker the slices, the longer they will take to bake. Bake for approximately 20 minutes or until they are golden and cooked through. Cool on a wire rack.
 You can make a quick glaze using confectioners sugar and milk to drizzle over the top (or not).


 In a large bowl, sift and thoroughly mix together the dry ingredients. In your stand mixer, or with a hand mixer, beat the butter and sugar until light and creamy – about 3 to 4 minutes.
 Beat in the egg and vanilla. Reduce the speed of your mixer, or by hand, add the dry ingredients and the lemon zest. Do not overmix or the cookies will be tough.
 Dump the dough onto a floured board and knead quickly into a ball. Cut the dough into two even-sized portions. Wrap with plastic wrap and refrigerate about an hour. Now preheat the oven to 350° and line your baking sheets with parchment paper. No greasing required.
 On a lightly floured pastry board, roll one portion of the chilled dough to about 1/8″ or 1/4″ thick. The thickness actually depends upon you. The thinner the cookie, the more crisp (and the more cookies). I like them a bit thicker – 1/4″.
 Bake at 350° for about 10 to 12 minutes, until just cooked through but not browned. Gently transfer the cookies to a cooling rack. Now roll, cut and bake the second batch of dough. While the cookies are baking, you might want to put the jam in a sieve to release any excess moisture. As Mary Berry says, ‘there’s nothing worse than soggy bottoms’.
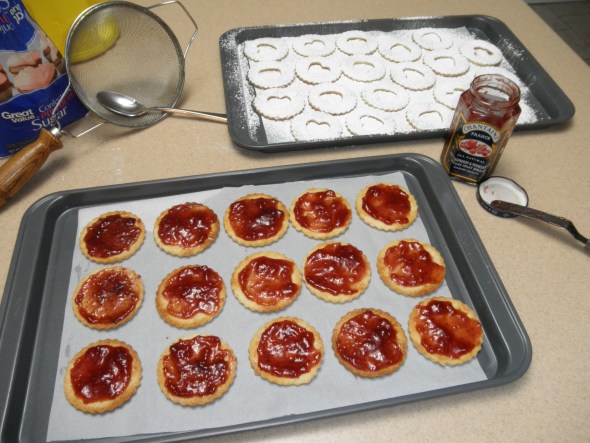 Use a sieve to sift the confectioners sugar generously over the cookie tops before assembling the cookie. Spread the jam on the bottom half of the bottom cookie. Don’t be overly generous with the jam or it will ooze out the sides. Place the top cookie on top of the bottom and you are done!
 Rich, fruity, nutty whether you call them Linzer Tarts or Tortes or Cookies or Augen doesn’t really matter. What does matter is that whatever you do decide to call them, I’m calling them absolutely delicious!!!

 In a small saucepan, over medium heat, melt the butter and stir in all the other ingredients. After the sugar has dissolved, take it off the heat to cool and add the zest of one lemon.
 Using one sheet at a time (put the other into the frig to stay cold), on a floured board, roll out the pastry to approximately 12” or ¼” thick.
 With a pastry cutter, biscuit cutter, or whatever you like to use, cut out approximately 24 circles. One will be for the bottom, one for the top. Brush all the pastry circles with the beaten egg white. Place a heaping teaspoonful of filling in the center of 12 circles. Take the top circle, place it on top of the bottom, covering the filling completely and then seal or crimp the edges together.
 Place the filled, sealed circles of pastry onto a parchment lined baking sheet. Brush the tops with more egg white. With a sharp knife, make two slits into the top for the steam to escape. Sprinkle each with Demerara sugar. Then place the baking sheet into the refrigerator to keep cold while you prepare the second sheet of puff pastry.
 After you’ve finished the second sheet, you should have two trays with approximately 12 Eccles cakes on each … ready to bake. Puff pastry bakes up lighter and fluffier when its really cold, so be sure to put the finished trays into the refrigerator while you preheat the oven.
 You can certainly make larger cakes, if you’d like, but for me, these sweet little confections are the perfect size for your afternoon tea. And I must say one of these Eccles Cakes with a cup of one of my most favorite teas, a Golden Yunnan, is so satisfying!
 In doing research for a good, authentic recipe, I’ve learned that Digestives actually originated during the elaborate Victorian period of Great Britain when long multi-course breakfasts and dinners were served. The Digestive biscuit was created as a way to ‘help’ aid digestion either after or before one of these marathon meals. The thought was the whole wheat flour and oatmeal would add fiber and the antacid properties of baking soda would aid “digestion”. Hence, the “Digestive“.
 In a small bowl, sift together the dry ingredients. In another bowl, with a mixer, cream the softened butter and brown sugar together.
 Preheat the oven to 350°. Working with half the dough at a time, put the other half back into the refrigerator. Working quickly, place the chilled dough onto a floured board and roll to 1/4″ thickness. Don’t roll too thin or they will crumble after baking. Cut with a 2″ cookie cutter (or smaller, if you want more cookies) and place on parchment lined sheet pans. This is a very wet dough so flour your work surface and work quickly.
 Bake for 15 to 20 minutes at 350° or until firm. It is not necessary to have them brown. The longer they bake, the crisper they will be. Remove the pans from the oven and let them cool completely before transferring the cookies to a wire rack.
 For chocolate Digestives, melt good quality bar chocolate in the microwave and then thin the melted chocolate with about 2 tablespoons of cream. Mix well. Either dip or spread the chocolate onto the cooled cookies. These cookies keep very well for a week or more in a tightly sealed container.
