ZUCCHINI STREUSEL BREAD

If you check out my recipes page, you’ll find that I have quite a few “zucchini” recipes.  There’s a reason for that … some vegetables  I can grow easily, and zucchini is one of them.  I’ve picked the last of the summer’s crop of zucchini for this year, and, believe me, it was a bumper crop as usual.  I’m not quite sure which of my zucchini recipes I like the best.  They are all tried, true and delicous!   My suggestion, give them all a try and then let me know.

This quick bread is a “go to” and not as complicated as it may look.  I like to make the streusel topping first and set it aside.  Then I mix the dry ingredients together …. the wet ingredients together and combine.  What could be easier!
Happy baking!

ZUCCHINI STREUSEL BREAD
Stays very well for 4 to 5 days if wrapped and refrigerated.  Or this bread can be made ahead and frozen for up to 3 months.  

2 large eggs, beaten
1/2 cup light brown sugar, packed
1 cup granulated sugar
1/2 cup vegetable oil
1/2 cup plain yogurt, non-fat or full-fat
2 teaspoons pure vanilla extract
3 cups grated, unpeeled zucchini (about 2 large)
3 cups all purpose, unbleached flour
2 teaspoons baking soda
1 teaspoon baking powder
1 teaspoon salt
2 teaspoons cinnamon
1/2 teaspoon nutmeg
Optional:  1 cup chopped walnuts, dried fruits

Preheat the oven to 375°.  This recipe will make two one pound loafs, one large 13 x 9 tray loaf or 24 muffins.  Grease and line whichever pans you’d like to use.

Grate the zucchini either by hand or with a food processor, then wrap the grated zucchini in a kitchen towel and squeeze out all the excess moisture.

In a large bowl beat together the eggs, sugars, vanilla, oil and yogurt.  When fully combined, fold in the grated, squeezed-dry zucchini.  A medium to coarse grating is perfect.

In another large bowl, sift together the flour, baking soda, baking powder, salt, cinnamon and nutmeg.  If you are adding walnuts, dust with a little flour first to prevent them from sinking into the batter.

Quickly fold the wet ingredients into the dry ingredients until well combined.  Don’t overmix.  Spoon the batter into the prepared pan(s).  Bake at 375° for half the total baking time – 25 minutes for breads – 15 minutes for muffins.  At this half-way point, you’ll want to generously spread the streusel topping onto the bread(s), pressing down slightly.

STREUSEL TOPPING
2/3 cup old-fashioned oats (not instant)
1/2 cup light brown sugar, packed
2 tablespoons flour
1 teaspoon cinnamon
1/2 stick cold butter, cubed
Optional:  1/2 cup chopped nuts, chocolate chips, Reese’s pieces, brittle

In a bowl thoroughly mix together the dry ingredients and then cut in the cold, cubed butter until the mixture looks crumbly.  Set aside until ready to spread onto the bread batter.  

Finish baking until a tester inserted into the middle of the bake comes out clean.  Cool on a wire rack for at least 15 minutes before removing from pan.

Now it’s time to put the kettle on and make that pot of tea.  When serving, there’s no need for butter, cream cheese or any other spread, this bread is moist, rich and delicious!  Have a second slice, you’ve earned it!!

_____________________________________________________________________________

PUMPKIN MUFFINS with CRUMB TOPPING

If “the muffin man” knew about these muffins, he’d still be in business today.  Dark, moist, spicy and absolutely delicious.  I’m pretty sure this easy-to-make recipe will become one of your “keepers” … and not just in the fall season.  The ingredient list might look long, but it is repetitive, so don’t be concerned.  You really don’t need that much at all.  And, if you bake, I’m sure you already have all these ingredients in your cupboard and frig.  If not, you might want to go shopping.

PUMPKIN MUFFINS with CRUMB TOPPING
Bake 375° 30 to 35 minutes.  Makes 9 to 12 (depending upon size).

1-3/4 cups all purpose flour
1/2 cup sugar
1/2 cup brown sugar
1 teaspoon baking soda
1/2 teaspoon baking powder
2 teaspoons ground cinnamon
1/2 teaspoon ground ginger
1/4 teaspoon ground allspice
1/2 teaspoon ground nutmeg
1/2 cup vegetable oil
1 15oz. can pumpkin (not pumpkin pie filling)
2 eggs, room temperature
1/2 cup milk

Topping
3/4 cup all purpose flour
1/4 cup sugar
1/4 cup brown sugar
1 teaspoon cinnamon
6 tablespoons butter, melted

Icing – optional
2 cups 10x sugar
1 tablespoons milk
3 tablespoons maple syrup

In a large bowl, combine the dry ingredients – flour, baking soda, baking power, salt, spices – whisk together til well blended and then set aside.  In another bowl, beat the oil and sugars, canned pumpkin, eggs and milk until smooth and well blended.

Mix the dry ingredients into the wet ingredients.  Don’t overbeat.  When completely blended together, spoon into paper lined (or greased) muffin pans.  Don’t overfill the muffin cups because you need to leave room for the topping.  Depending upon how large you’d like the muffins, you should get 12 good sized muffins.

In a third bowl, mix together the flour, sugars and cinnamon.  When well blended, add the melted butter and, with a fork, mix til crumbly.  Spoon this topping onto each muffin cup.  Press the topping down a bit so that it doesn’t fall off.

Bake in a preheated 375° oven for 30 to 35 minutes, or until a cake tester inserted into the middle comes out clean.  Remove from the oven and let them cool in the pan for about 10 minutes, then remove them from the pan and onto a rack.

In a small bowl mix the milk, maple syrup and confectioners sugar together until smooth.  Drizzle liberally over the tops of the cooled muffins.

That’s it!  Easy, peasy lemon squeezy!  Now go put the kettle on because you are definitely going to want a nice, hot cuppa with one of these moist, delicious pumpkin muffins.

_____________________________________________________________________________

THE MUFFIN MAN

Do you know the muffin man … the muffin man … the muffin man?  Well, if you mean the one who lives on Drury Lane … Yes, I know the muffin man!   I am dating myself now, quite certainly, by recalling this childhood song.  I doubt any millennials can sing it, or have ever heard of it.  But one thing I do know is that I love English muffins.  Doesn’t everyone?  Splitting an English muffin in half, toasting it and spreading it softened butter and jam has to be one of the best breakfasts I know of … although they weren’t originally intended to be eaten that way.

In America we think of ‘muffins’ s as small hearty, cake-like breakfast items, which may or may not be made with fruit and nuts.  These are not to be confused with English muffins, which we sometimes call “crumpets”.  Although both did originate in England and both are griddle cakes, technically, a “crumpet” is a bread-like dough using baking powder as its leavening agent, while “muffins” use the same bread-like dough but with yeast as its leavening agent.  Also, crumpets are meant to be eaten without slicing open … muffins are sliced open.  Confusing, I know.

If you’ve watched Downton Abbey, or Upstairs Downstairs, you know that all wealthy aristocratic families had their own kitchen staff which, depending upon the size of the household, included cooks and bakers.  The “muffin” or “crumpet” originated from the leftover dough the bakers would be baking that day.  He or she would take the leftover bits, roll them up into a ball, flatten them and toss them onto a hot griddle.  These would then be enjoyed by the “downstairs” staff at tea time.  These crusty morsels were such a tasty hit, the “upstairs” family wanted them too.  It wasn’t long before these bready treats were also being served “upstairs” at tea time.

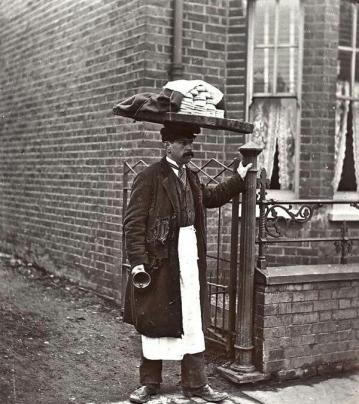
The word quickly spread about these delicious, small, round grilled rolls.  And soon bakers everywhere were making them and peddling them on the streets to the working classes.  At that time it was far too dangerous for city homes and apartments to have an indoor working oven.  As a result most people could not do their own baking.  So this inexpensive bread roll became an easy breakfast to grab and go while on the way to work.  Early in the morning, on the streets of London, with a wooden board balanced on his head and a bell in hand, the “muffin man” would walk up and down the “lanes” ringing his bell to signal his arrival.

And now that we know who the muffin man was, let’s make some muffins!  I’m using British bread baker, Paul Hollywood’s recipe.  Not quite sure how they are going to turn out, but let’s have fun trying.

ENGLISH MUFFINS
Makes 8 to 10 good-sized muffins.  Prep time:  about 2 to 3 hours.

2-1/3 cups white, bread flour
1 tablespoon active dry yeast
1 teaspoon salt
1 tablespoon sugar
1 tablespoon softened butter
1 medium-sized egg at room temperature, beaten
2/3 cup milk, warmed
vegetable oil
corn meal

This makes a VERY wet, soft and sticky dough and can be tricky to handle.  Should it get too sticky while kneading, let it rest for ten minutes.  The gluten will relax and then go back to kneading.

In a large mixing bowl with a paddle attachment (or by hand), mix all the dry ingredients together.  You may want to dissolve the dry yeast in the warmed milk, or not.  It’s up to you.  If you dissolve the yeast in the warmed (not hot) milk, it will shorten the proving time a bit.

Add the milk (yeast mixture), beaten egg and softened butter.  Beat all the ingredients together until smooth, glossy and the dough has formed a ball.  Turn the dough out onto a lightly floured board and let it rest for ten minutes.

After ten minutes, begin kneading.  It  will be STICKY.  Don’t add more flour or you will change the structure of the dough.  Continue kneading (scraping the board if necessary) until the dough has stopped sticking and is smooth and shiny.  This will take about 15 minutes.

Place the dough into a lightly greased bowl, cover with plastic wrap and put it in a warm place to double in size.  If you want to make the dough at night to cook in the morning, just place the dough into the refrigerator.  This will slow down the proving process.

When the dough has doubled in size, tip it out onto a lightly floured board which has been dusted with corn meal.  Roll the dough out like a pizza to about 1″ thick.  Using a biscuit cutter, dusted with flour (or tuna fish can, which is what I use), cut out the ‘muffins’.  You should get between 8 and 10.

Place the muffins onto a parchment lined sheet which has also been dusted with corn meal.  Cover the muffins lightly with plastic wrap and let them rest for about 30 minutes.

Preheat a stove-top griddle over medium heat.  Lightly oil the griddle.  If you prefer to oven bake them, preheat the oven to 350° and use a heated pizza stone.  When the griddle is ready, toss the biscuits onto the surface and cook them for about 10 minutes or more on each size, depending upon the thickness of the muffins.  Baking will take about 25 minutes (flipping them over half way).

When done, move them to a wire rack to cool.  Then put the kettle on, get the butter and jam.  Slice one open and lash on the goodness.  You deserve it.  Honestly, once I realized how to work with such a sticky dough, they were quite easy.  Now they are going to be a weekly treat … perfect for a weekend breakfast.

Ella Fitzgerald can even make this little ditty sound good.  Listen ……

~ ~ ~ ~ ~
References:  Kitchen Project, The Foodies Companion, Bread Through History, BBC Food

_____________________________________________________________________________

Here Zucchini, There Zucchini, EVERYWHERE Zucchini!

I have never had a harvest of zucchini (courgettes in G.B.) as I’ve had this year!  It’s out-of-control!

This photo is just from this morning’s romp in the garden. Believe me, my garden is small … and I am no gardener. But, what to do with this latest batch??? So far, I’ve sliced, diced and stuffed zucchini.  I’ve pickled zucchini, frozen zucchini, made ratatouille, frittatas and quiches.  I’ve added zucchini to salads, stir fries and soups.  I’ve made zucchini muffins, breads, and fritters … and of course, the delicious lemon zucchini drizzle cake and chocolate zucchini bread (recipes available).  Friends, family, co-workers and neighbors don’t want them.  Yikes, what am I going to do?

I am tough … I’ll trudge on … bound and determined to use them all.  So, today I am making Mock Apple Shortbread Bars, a great, easy-to-make recipe that will have everyone scratching their heads.  Trust me!

MOCK APPLE SHORTBREAD BARS
Bake 350°.  Makes 40 or more (depending upon how big or small you cut them)

6 cups fresh zucchini, peeled, seeded and diced (about 3 large)
1/2 cup lemon juice
1 cup sugar
1 tsp. cinnamon
3-1/2 cups all purpose flour
1 cup sugar
1 tsp. salt
1 tsp. cinnamon
1/2 cup brown sugar
3 sticks butter, icy cold and cubed
1 cup chopped walnuts (optional)
1 cup oatmeal (not instant)

Use a large 16″ x 10″ sheet or jelly roll pan and line it with parchment paper or grease it well.  I like to use parchment paper so that I can lift everything out of the pan at once, let it cool and then slice.

In a large sauce pan, saute the diced zucchini with the lemon juice for about 10 minutes until soft (not mushy).  Add the sugar and cinnamon and cook for another minute or two.

While the zucchini is cooking, in a very large mixing bowl, combine the flour, salt, sugars and cinnamon.  Cut in the butter (just as if you’re making a pie dough or scones) until the flour is pea shaped and crumbly.  You can certainly do this by hand, but I like using a food processor.

From this flour mixture, take 1/2 cup and stir it into the cooked zucchini til blended with no lumps.  This will help to thicken the zucchini so that its not runny.

Add the oatmeal and chopped walnuts to the rest of the flour mixture and then take half of that and press it into the prepared sheet pan.  Really press down on it because this is going to be the crust.

Spread the cooled zucchini mixture over the crust.  Then, on top of the zucchini, spread the rest of the flour mixture and press down lightly.

Bake at 350° for 45-55 minutes.  The bars should be lightly browned, cooked on the bottom and the filling bubbly.  Cool thoroughly before slicing.  Cut them in squares, bars, diamonds.  Keep them large or small.  Trim the edges as I have here, or not.  There are no rules!

Serve these as a ‘grab and go’ bar cookie, or plated as a dessert with a scoop of ice cream. They’re great for picnics or the beach.  Crunchy and sweet, a gooey filling with a hint of cinnamon.  Your family will love them and they’ll never know they are eating their vegetables!

So if your garden is exploding with zucchini (or even if it is not), add this really easy-to-make, delicious  “mock apple bar cookie” to your ‘go to’ zucchini recipes!!  Absolutely delicious!

_____________________________________________________________________________