
We’re all doing our best during these stressful times to stay home, stay active and stay informed. Hubby and I put it off as long as we could, but finally had to make our way into the grocery store. Well, it was obvious that we were quite a bit late. Needless to say, all the cleaning supplies, toilet paper, paper towels, etc. were gone, but baking ingredients? Baking is what I like to do to relax, and apparently, a lot of people share in this, because the flours, sugars, and all of the essential baking ingredients were also not to be found. I was completely unprepared to see even these supermarket shelves barren. It’s a good thing I had some of the basic items at home.
With that in mind, what challenge do I need to take on with my limited pantry? Having just received the latest edition of COOKS ILLUSTRATED (a periodical I’ve relied upon for other recipes), there it was … Crumpets! I’ve never made Crumpets before and felt the need to tackle something new. The article was a full two-pages on how to make ‘authentic crumpets’, which should have been my first clue.
What are Crumpets? I think they are most easily described as Britain’s version of an English muffin. Perfect for breakfast or teatime, they are a home-spun, belly filling, crisp on the outside, kind’a doughy on the inside, griddle cake. The best way to eat them is toasted and slathered with butter or jam, or butter AND jam.
The COOK’S ILLUSTRATED recipe called for “cake flour”, which struck me as rather odd, because this is hearty comfort food, not a delicate sponge. Hubby said I needed ring molds. Really? COOK’S ILLUSTRATED didn’t say I needed them. Why can’t I just drop the dough onto the griddle in rounds? After trying to do exactly that, I can tell you, hubby was right … you’re not going to get nice, fat, round muffins. You are going to get something flat and misshapen like a pancake. The recipe said to ‘scrape off the top of the batter, before flipping, to expose the beautiful air holes’. Why that alone didn’t make me toss the recipe aside, I’ll never know. I plunged ahead anyway.

Epic Fail Crumpet Flapjacks
Three hours later, all 12 misshapen, gluey, tasteless griddle cakes went into the trash. If you want to make Crumpets, I do not recommend the COOK’s ILLUSTRATED recipe. I did, however, go through all my cookbooks, as well as online recipes and, after four more attempts, ended up making delicious Crumpets with thanks to Paul Hollywood.

DIY crumpet ring molds
Not having crumpet rings and looking frantically for something to use, I ended up squashing some cookie cutters into roundish molds. They aren’t pretty, but they worked. And with my final attempt to make these crumpets, I decided they should be a bit more nutritious. Why not Whole Wheat?
Super easy to prepare … although the grilling part was a bit tricky. You can easily use a bowl and wooden spoon, but I choose to use my stand mixer. And, you can prepare the batter the night before and grill them in the morning. What could be easier than that? Eat them as they come off the grill, or make ahead and freeze. Either way, when you’re ready to eat them, be sure to toast the crumpets til crisp and slather them with rich, creamy butter. Here’s the recipe. I hope you give it a go!!
WHOLE WHEAT CRUMPETS
Makes approximately: 10 to 12 4″ crumpets. Cook time: 8 to 12 minutes.
1 cup bread flour (or all purpose flour)*
1 cup whole wheat flour*
1 cup warm milk
1 teaspoon salt
1 tablespoon active dried yeast
1 tablespoon sugar
1 cup water
1 teaspoon baking soda
*(or you can use two cups all purpose flour)
 First, warm the milk in the microwave (not too hot) and stir in the yeast and the sugar. Let it rest for 10 minutes until its frothy.
 In a large bowl, stir together the flours and the salt. Add the warm milk mixture and stir together until a thick dough forms. If using a stand mixer, use the paddle attachment. Let it mix for about 3 or 4 minutes.
 No need to take it out, knead it and grease the bowl. Just cover the bowl with a towel and put it aside to rise for about an hour, or until the dough has doubled in size.
 When it has doubled and will hold an indentation from your finger, it’s ready. Mix together the cup of water with the baking soda. Now comes the tricky part, mix this liquid into the dough. It’ll be difficult at first. I used a fork to break the dough up, and then beat the mixture with a wooden spoon until it was somewhat smooth (but not perfect … still a bit lumpy).
After the water/baking soda liquid has been fully incorporated, cover the bowl again and put it aside for another hour. When it’s ready, there should be bubbles on the surface.
Preheat a skillet, griddle or cast iron pan on medium heat and oil it a bit. Not too generously. But, generously grease the inside of the ring molds. If you don’t, the batter will stick and you’ll never get them out. Put the rings onto the skillet to get hot as well.
 Using a ladle or tablespoon, spoon equal portions of the batter into the molds. The batter will be sticky and gloppy. Don’t be concerned. That’s how it’s suppose to be. Keep an eye on the heat to be sure they don’t burn on the bottom, turning it down as necessary. They will rise and as with pancakes, they will be almost fully cooked before they need to be flipped over (about 6 minutes on the first side). When the top has lost its gloss and the sides look firm, remove the rings. The rings will be hot, so use tongs. With a spatula, flip the crumpets over and let them cook on the other side for just another minute.
The crumpets should be lightly browned and ready to eat. Move them to a rack and let them cool for a bit, as they will continue to cook on the inside for a minute or two. Re-grease the ring molds and put them back on the griddle to heat up and then ladle in more batter. Keep going until all the batter is gone. Depending upon the size of the rings, this recipe will make 8 to 12 crumpets.

Whole Wheat Crumpets
Crumpets are delicious hot off the griddle with a generous slathering of butter. If you are going to toast them, don’t slice them open. They aren’t English muffins. We really liked the whole wheat flour, giving these crumpets a darker color, rich nutty flavor. Half of them were gone, the moment they came off the griddle. I wrapped the others, put them into the freezer, and they’ll be perfect for the weekend.

If you make them, please be sure to let me know how they came out.
I hope you enjoy them as much as we do.
_____________________________________________________________________________

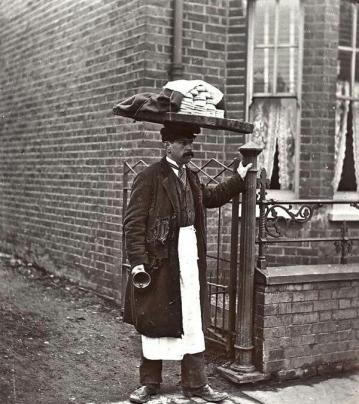 The word quickly spread about these delicious, small, round grilled rolls. And soon bakers everywhere were making them and peddling them on the streets to the working classes. At that time it was far too dangerous for city homes and apartments to have an indoor working oven. As a result most people could not do their own baking. So this inexpensive bread roll became an easy breakfast to grab and go while on the way to work. Early in the morning, on the streets of London, with a wooden board balanced on his head and a bell in hand, the “muffin man” would walk up and down the “lanes” ringing his bell to signal his arrival.