
Just a few months ago I posted a blog titled “Gingerbread“. In case you think I might be losing my mind, I’m not (hopefully), this blog is about making (and eating) Gingerbread. If you want to know the origins of how this exotic spice became such an important part of the culture in Great Britain, please click on this link … GINGERBREAD. It will give you all the background you’ve ever wanted to know about ginger and the making of this confection. Meanwhile, I’m actually making my own moist, dense, rich ‘GINGERBREAD‘.
As always, before making any recipe, I go through all my cookbooks (of which I have more than I can count) as well as check all the internet foodie blogs to find the ‘best of the best’ recipes. Some recipes were more like a light, fluffy spice cake with cream cheese frosting. Not what I was looking for at all. What I wanted was an old-fashioned, dense, rich cake-like bread. It should be easily held in your hand, not requiring a plate. It should be packed full of peppery ‘ginger’ flavor … not cinnamon, cloves or allspice. It should be moist … not dry. And, most of all, it should be delicious.
I’ve tried more recipes than I want to admit. And culled from a few different recipes, here is MY favorite by far. It is quite easy to make, but it’s not for the timid. It’s for ginger lovers everywhere. If you want more or less ginger, feel free to adjust the quantities.
GINGERBREAD
Bake at 350° Makes one large round bundt pan, or two or more loaf pans.
3/4 cup butter, cubed
1/2 cup vegetable oil
1/2 cup water
3/4 cup molasses
1/2 cup cane syrup, or corn syrup or honey
1 cup packed dark brown sugar
2-1/2 cups all-purpose flour
1/2 cup cocoa
3 teaspoons baking soda
1 teaspoon salt
3 tablespoons ground ginger (more or less to taste)
1 teaspoon cinnamon
3 large eggs, room temperature
1/2 cup full-fat milk
2 tablespoons grated fresh ginger
 About an hour before you want to make the Gingerbread, combine the following ingredients in a saucepan: Cubed butter, vegetable oil, water, molasses, brown sugar, golden syrup or honey. Simmer over low heat until the butter is melted, the sugar has dissolved and everything is well combined.
 Cool completely before adding this mixture to the dry ingredients. It should be just warm to the touch. If you want to cool this mixture quickly, set the pan into a bowl of ice water.
Preheat the oven to 350° and prepare your baking pans – a large round pan, or as many smaller pans as you’d like. Grease well.
In a large mixing bowl, combine all the dry ingredients: flour, cocoa, baking soda, salt, ground ginger and cinnamon.
 In a separate, smaller bowl, lightly beat together the eggs, milk and grated ginger.
When the syrup mixture has cooled, add it slowly to the dry ingredients. Blend well, but don’t beat. Then add the egg/milk/ginger combination to the batter. Again, be sure to blend well, but be sure not to overbeat the batter. Low speed on an electric mixer is fine. You don’t want to build up the gluten.
 Pour the batter into the greased pan(s) and bake. Depending upon the pan size and shape, it could take between 45 and 60 minutes. Check for doneness when a tester comes out clean.
 Cool for 15 minutes before removing from the pan. Then put on the kettle and don’t be afraid to dive in. It freezes well if you want to wrap it tightly in foil. Or it will keep nicely in the frig for a week, wrapped in cling film.
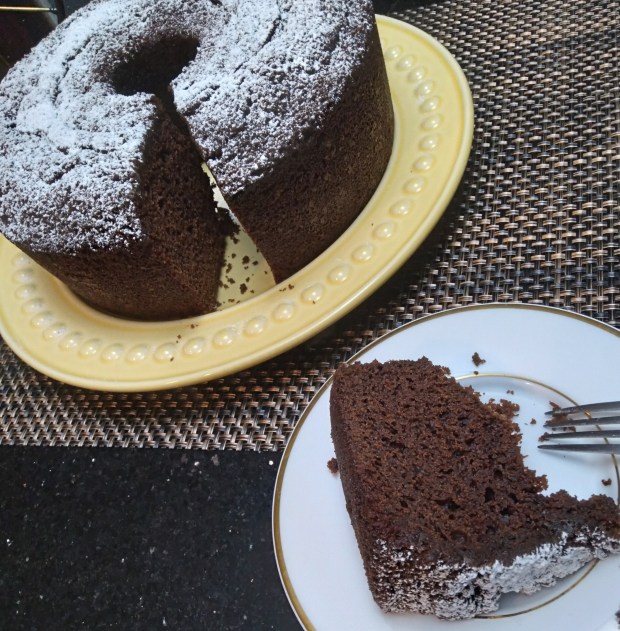 Dense, gingery and moist. I love this Gingerbread warm with a dusting of powered sugar and a big mug of tea! This is perfect for the holidays. Keep one on hand ready to serve for anyone who drops by … or just make to enjoy all by yourself!!
_____________________________________________________________________________


 I’ve read that the first known recipe for ‘gingerbrede’ came from Greece in 2400 BC. Really? How do they know that? I do know, however, that food historians have traced ginger as a seasoning since antiquity. From my research, it seems an Archbishop from Armenia, in the 1st century, is credited with serving his guests a cake made of spices. By the tenth century, its proven that Chinese recipes for ‘spice breads’ were developed using ginger, and by the 13th century European nuns in monasteries were known to be baking ‘gingerbredes’ to ease indigestion. As spices, and in particular ginger, made their way throughout Northern and Western Europe, these breads baked in monasteries became so popular professional bakers began to make them. The ingredients, of course, were a bit different from what we would expect. Ground almonds, breadcrumbs, rosewater, sugar and ginger were mixed together and baked. It wasn’t until the 16th century when eggs and flour were added.
 Did you know Queen Elizabeth I is credited with creating the first “gingerbread man”? Known for her outlandish royal dinners, Queen Elizabeth employed a ‘Royal gingerbread baker’. Among her array of fancy desserts were not only birds, fruits, and castles shaped out of marzipan, but also of gingerbread. The first documented gingerbread-shaped biscuit actually came from the court of Queen Elizabeth when she commissioned figures to be made in the likeness of some of her important guests. They were the hit of the court and soon these biscuits made their way into the bakeries.
 Elaborately decorated gingerbread became so synonymous with all things fancy and elegant that the Guilds began hiring master bakers to create works of art from gingerbread. Bakers began carving wooden boards to create elaborately designed molds to shape individual images. The shapes included not only flowers, birds, and animals, but even people. They were in such demand, kings and queens, lords and ladies, knights and bishops wanted their images captured in “gingerbread”. Should a young woman want to improve her chances of attracting a husband, she would have a “gingerbread man” made for her in the likeness of her gentleman’s image. The hope was that if she could get him to eat the spicy delicacy, he would then fall in love with her. Decorated gingerbread was given as a wedding gift, or to celebrate a birth or special occasion.
 In many European countries, gingerbread is still considered an art form, and the antique mold collections are on display in many museums. According to the Guiness Book of World Records, the largest gingerbread man was made in Norway in November 2009 and weighed 1,435 lbs. And the largest gingerbread house was made in Texas, November 2013 by the Traditions Club – 60 ft. long, 42 ft. wide and 10 ft. tall – all to raise money for St. Joseph’s Hospital.
 First, line up all your ingredients. Don’t be one of those bakers who goes looking for things as you go along. If you have everything in front of you, you’re less apt to make a mistake and forget something. Then, preheat your oven and prepare your pan. Most ovens take 20 minutes or more to heat up thoroughly. A $5.00 oven thermometer is a great investment and saves a lot of baking disasters.
 In a large bowl (or food processor) add the dry ingredients. Mix well or pulse two or three times. Cut the icy cold butter into cubes and add it to the dry ingredients until it resembles fine crumbs. Again, if using a food processor, PULSE 10 or 12 times … no more!
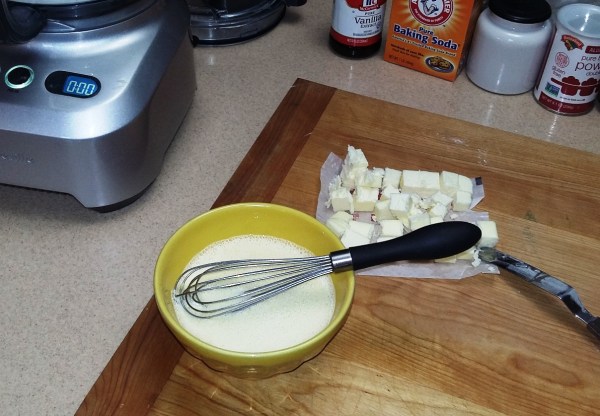 In a small bowl mix together the egg, milk and vanilla. Then add this wet mixture to the dry mixture. Stir it in with a fork or PULSE a few times just to combine everything.
 Turn the mixture out onto a floured board. Knead a few times to bring it together. Do not overwork the dough or your scones will be tough and won’t rise properly.
 Form the dough into a round and with a rolling pin, gently roll until you have about 3/4″ thickness. Cut the dough into triangles (or you can use a cutter to cut out shapes). Place the triangles onto a parchment lined baking tray.
 In another small bowl, mix the chopped nuts, sugar and cinnamon. Sprinkle over the scones, pressing down lightly to fix them onto the scones. This is completely optional.
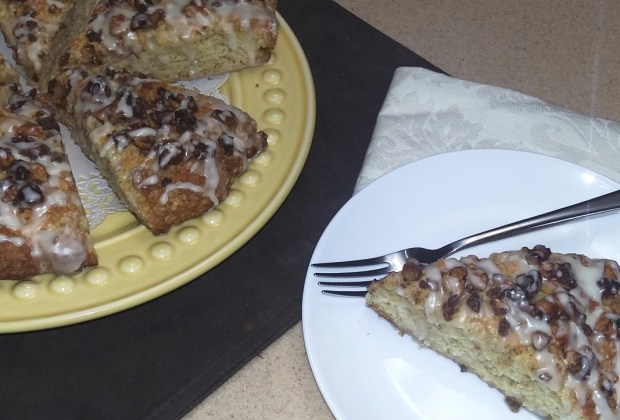

 Tomato Jam! The “world wide web” had done it again! Tomato Jam it was going to be. I narrowed it down to three of what appeared to be, from the reviews, reasonably successful recipes on three reasonably successful websites. Before trying any recipe from any website, I always check out the reviews. Most of the reviews are merely comments from people saying “how good that looks”, or “I can’t wait to try this” yet never having made it. Or, “this was delicious after I added ‘this, that or the other’ and ‘cooked it for'”. So, it can be a bit frustrating and does take a bit of sifting through each review to find those who actually have made the ‘original’ recipe.
 This is beginning to sound like Goldilocks and the Three Bears. All the recipes did agree, however, that the jam would be sweet, spicy and delicious … a wonderful spread on sandwiches, with cream cheese and crackers, as a condiment or dip.
 That evening I take one container out and, yes, it’s finally thick, rich, sweet, spicy Tomato Jam! Hooray! What the problem was, I will probably never know. Were my tomatoes too juicy? Should I have removed the seed pods? Did the other recipes intentionally mislead readers? As for now, Tomato Jam is on the table and we’re going to enjoy it tonight as a spread on our leftover pot roast with goat cheese, arugula and sauteed onion sandwiches.
 Line the pie plate (or tart pans) with the pastry. I like to use tart shells … just because they look so pretty. Put the pastry-lined pan into the refrigerator to get really cold.
 Take the pastry out of the refrigerator and place it on a baking tray. Then arrange the sauteed apples with the caramel sauce on the bottom of the pie. Leave a few apples out for decorating the top. Put the baking tray in the oven before pouring in the custard. This will help avoid spillage.
 Pour the custard on top of the apples. Bake at 350° for about 40 to 50 minutes until set (but still a little jiggly in the center). The pastry should be browned and a slight browning on the custard.
 Remove from oven and arrange the saved apples on top. Drizzle with the caramel. Let cool completely before serving. Flaky crust, creamy custard and cinnamon apple goodness … what more could you want this time of year? Now go ahead, put the kettle on, and wait for all the compliments!!
 ~ ~ ~ ~ ~

 These indigenous people had no experience laboring in this manner, and under deplorable working conditions. The British viewed them as “lazy, indolent and miserable”. As a result, the British began “importing” labor from other parts of India. This “importing” of labor was, in fact, slavery. Recruiting agents were sent into rural areas and promised a good wage and better life to men, women and children … ‘recruits’ who willing to immigrate to Assam. When they had enough ‘recruits’ from one area, they loaded them onto overcrowded boats with appalling conditions for the six- to eight-week trip up the Brahmaputra River. Many of the men, women and children, or ‘coolies’ as they were called (t
 Most often the only source of nourishment for the ‘coolies’ was rice and tea. No, not a good quality tea, but tea made from the dregs of the pluckings, infused with some milk for nourishment, sugar for energy, and spices to cover up the bad taste. As a result, coolies suffered a very high mortality rate. Between 1863 and 1866 half of the 84,000 laborers brought into this area died. As I said, the history of “tea” and this now-beloved drink isn’t the sweetest tale. Many thousands upon thousands of people died from malnourishment, disease and mistreatment.
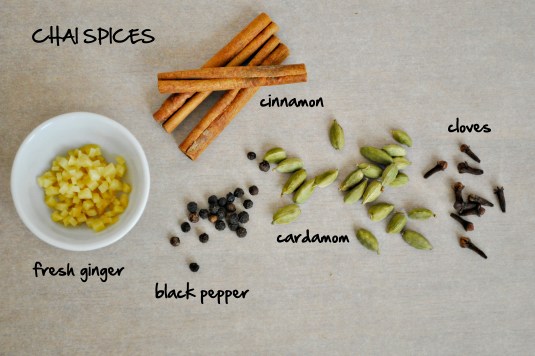
 Yes, making it yourself does take about 15 minutes or more, and you can certainly buy prepared chai in bottles or packages, or even dry chai mixes, but taking those 15 minutes is so worthwhile. And, if you make too much, just put it into the refrigerator and enjoy it cold the next day, over ice, or reheat it. In the summertime, I love to make chai shakes … with a scoop of vanilla ice cream in the blender. Try it. It’s absolutely delicious!!


