
Are these rich, shortbread-like nutty pastries with their fruit filling, topped with a sweet powdery cookie called Linzer Tarts or Tortes … or Linzer Cookies … or are they Linzer Tart/Torte Cookies? Could they also be Linzer Augen or Linzer Eyes? It’s so confusing. I’ve looked all over the ‘web’ and I can’t seem to get a definitive answer. I believe Linzer Tortes are the large lattice-topped, pie-shaped pastries, cut into wedges and served wit a dollop of cream. Now to find out …
As with so many other dishes, the Linzer Torte is named for the city from where it was invented … Linz in Austria. “Torte” is German for ‘a rich cake made with eggs, flour and nuts’.

Linz, Austria
According to Wikipedia, the Linzer Torte is said to be the oldest ‘cake’ in the world. I think I’ve read that statement about most of the desserts I’ve researched. Although with an original recipe dating as far back as 1653, it does qualify as ‘old’.
This rich, fruity dessert was a hidden gem in Austria until a pastry chef started mass producing it around 1820. From Austria the recipe was brought to the U.S. in 1856 by a young Austrian, Franz Holzlhuber. It seems a very artistic and talented Franz had a job promised him in Wisconsin, so he packed up his things and traveled west. Unfortunately, between Austria and Wisconsin, not only did he lose his luggage, he lost the job. With nothing else to lose at that point, Franz went to work as a baker in Milwaukee and introduced America to the Linzer Torte.
Today, if you search online for Linzer Cookies or Tarts, you’ll see them referenced as Christmas treats. I’m not sure why. Could it be that they take a little more time and effort to make, and the only time we put any effort into baking is during the holidays? Yes, these cookies take a bit more time, but not that much, and they are so worth it. (William Sonoma sells a dozen of these cookies for $49.95 …. yikes!!)
My shortcut, unlike Martha Stewart’s recipe, is to use almond meal … which is simply ground almonds. If you want to use hazelnut meal, or any other ground nuts, feel free. They are usually available in better grocery stores.
LINZER TORTE COOKIES
Preheated oven 350°. Makes approximately 24 2-1/2″ cookies.
1 cup ground almond meal
2 cups all-purpose flour
1/2 teaspoon baking powder
1/2 teaspoon salt
zest of one lemon
2 sticks unsalted butter, at room temperature
3/4 cup sugar
1 large egg, at room temperature
1 teaspoon vanilla
1 jar good quality raspberry jam (or any other flavor)
confectioners sugar to sprinkle
No need to preheat the oven until later because these cookies are easier to handle if the dough is chilled for an hour.
 In a large bowl, sift and thoroughly mix together the dry ingredients. In your stand mixer, or with a hand mixer, beat the butter and sugar until light and creamy – about 3 to 4 minutes.
 Beat in the egg and vanilla. Reduce the speed of your mixer, or by hand, add the dry ingredients and the lemon zest. Do not overmix or the cookies will be tough.
 Dump the dough onto a floured board and knead quickly into a ball. Cut the dough into two even-sized portions. Wrap with plastic wrap and refrigerate about an hour. Now preheat the oven to 350° and line your baking sheets with parchment paper. No greasing required.
 On a lightly floured pastry board, roll one portion of the chilled dough to about 1/8″ or 1/4″ thick. The thickness actually depends upon you. The thinner the cookie, the more crisp (and the more cookies). I like them a bit thicker – 1/4″.
Using a 2″ to 3″ cookie cutter, cut the dough and place the cookies on the parchment-lined sheets. Flouring the cookie cutter helps to keep it from sticking. Using a smaller cookie cutter – circles, hearts, stars, whatever you’d like – cut out the center from half of the cookies. Remember, you are making tops and bottoms. Gather up the cuttings and knead them back into the left-over dough and continue rolling and cutting.
 Bake at 350° for about 10 to 12 minutes, until just cooked through but not browned. Gently transfer the cookies to a cooling rack. Now roll, cut and bake the second batch of dough. While the cookies are baking, you might want to put the jam in a sieve to release any excess moisture. As Mary Berry says, ‘there’s nothing worse than soggy bottoms’.

When all the dough is baked and thoroughly cooled, turn the bottoms over so that you are assembling bottoms to bottoms.
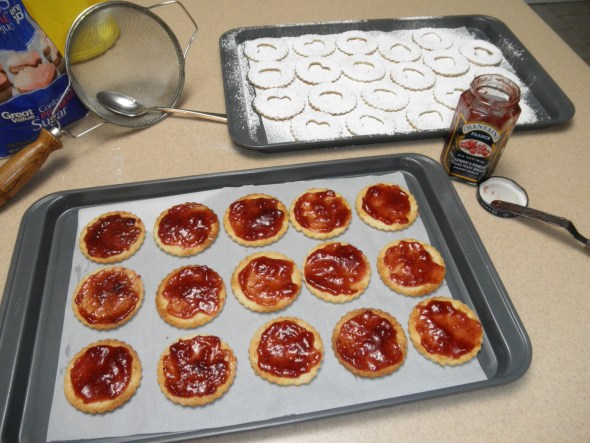 Use a sieve to sift the confectioners sugar generously over the cookie tops before assembling the cookie. Spread the jam on the bottom half of the bottom cookie. Don’t be overly generous with the jam or it will ooze out the sides. Place the top cookie on top of the bottom and you are done!
 Rich, fruity, nutty whether you call them Linzer Tarts or Tortes or Cookies or Augen doesn’t really matter. What does matter is that whatever you do decide to call them, I’m calling them absolutely delicious!!!
~ ~ ~ ~ ~
References: Wisconsin Historic Society, Wikepedia
_____________________________________________________________________________


 On a lightly floured board, roll the sheet of puff pastry out until its about 10″ x 12″. You don’t want the pastry too thin or the filling will pop through.


 picking up a couple of brochures, we walked down the path into the village … and this unique, quirky, colorful little village unveiled itself.

 nd transporting the glorious buildings, columns, ceilings, plasterwork, stones, all took time and money. He knew that eventually the only way this place was going to succeed financially would be with tourist dollars. He was right.
 For shopping, of course there is Portmeirion Pottery. In New England you can find world-class Portmeirion pottery in every high-end gift shop. But, honestly, I wasn’t quite clear on the connection between “Portmeirion the village” and “Portmeirion the dishware”.


 In a small saucepan, over medium heat, melt the butter and stir in all the other ingredients. After the sugar has dissolved, take it off the heat to cool and add the zest of one lemon.
 Using one sheet at a time (put the other into the frig to stay cold), on a floured board, roll out the pastry to approximately 12” or ¼” thick.
 With a pastry cutter, biscuit cutter, or whatever you like to use, cut out approximately 24 circles. One will be for the bottom, one for the top. Brush all the pastry circles with the beaten egg white. Place a heaping teaspoonful of filling in the center of 12 circles. Take the top circle, place it on top of the bottom, covering the filling completely and then seal or crimp the edges together.
 Place the filled, sealed circles of pastry onto a parchment lined baking sheet. Brush the tops with more egg white. With a sharp knife, make two slits into the top for the steam to escape. Sprinkle each with Demerara sugar. Then place the baking sheet into the refrigerator to keep cold while you prepare the second sheet of puff pastry.
 After you’ve finished the second sheet, you should have two trays with approximately 12 Eccles cakes on each … ready to bake. Puff pastry bakes up lighter and fluffier when its really cold, so be sure to put the finished trays into the refrigerator while you preheat the oven.
 You can certainly make larger cakes, if you’d like, but for me, these sweet little confections are the perfect size for your afternoon tea. And I must say one of these Eccles Cakes with a cup of one of my most favorite teas, a Golden Yunnan, is so satisfying!


 Historians have been able to trace the origins of “Chocolate”, which is the result of roasting the ground beans of the cacao plant, back to as early as 1900 B.C. in Mexico, Central America and South America. The Mayans and Aztecs used the pulverized seeds of the cacao plant, together with water and chili pepper, to brew ceremonial drinks. They actually believed the cacao bean had divine and magical properties, which made it suitable for use in the most sacred rituals of birth, marriage and death. The word “Chocolate” comes from the Maya word “xocoatl” which means “bitter water”.
 It’s hard to know who to credit in the mid-16th century with introducing Spain to the cacao bean and the “hot beverage” that was made from it. Was it the explorer Christopher Columbus, the conqueror Hernán Cortés, or was it the returning missionary Dominican friars? Whoever it was certainly made an impression on the Spanish court. This hot, bitter beverage made from the pressed blocks of dried cacao beans and hot water became a hit with Spanish aristocracy, but only after they began adding honey or sugar to it. They found it most enjoyable when mixed with milk and flavorings such as vanilla, cinnamon, ground cloves, allspice and chilies.
 Back in England, it was an entrepreneurial Frenchman now familiar with this wonderful elixir who, wanting to elevate the chocolate experience in London, removed it from the bawdy coffee house atmosphere and in 1657 opened the first “chocolate house”. As always, the wealthy elite were the only ones who could afford this luxurious experience. Tea was very dear, selling at
 h paved the way for the solid chocolate we all know and love. This also resulted in making chocolate affordable to everyone. And in 1830, J. S. Fry and Sons, a British chocolate maker, is credited with making the first solid, edible chocolate candy bar.


 In doing research for a good, authentic recipe, I’ve learned that Digestives actually originated during the elaborate Victorian period of Great Britain when long multi-course breakfasts and dinners were served. The Digestive biscuit was created as a way to ‘help’ aid digestion either after or before one of these marathon meals. The thought was the whole wheat flour and oatmeal would add fiber and the antacid properties of baking soda would aid “digestion”. Hence, the “Digestive“.

 In a small bowl, sift together the dry ingredients. In another bowl, with a mixer, cream the softened butter and brown sugar together.

 Preheat the oven to 350°. Working with half the dough at a time, put the other half back into the refrigerator. Working quickly, place the chilled dough onto a floured board and roll to 1/4″ thickness. Don’t roll too thin or they will crumble after baking. Cut with a 2″ cookie cutter (or smaller, if you want more cookies) and place on parchment lined sheet pans. This is a very wet dough so flour your work surface and work quickly.

 Bake for 15 to 20 minutes at 350° or until firm. It is not necessary to have them brown. The longer they bake, the crisper they will be. Remove the pans from the oven and let them cool completely before transferring the cookies to a wire rack.
 For chocolate Digestives, melt good quality bar chocolate in the microwave and then thin the melted chocolate with about 2 tablespoons of cream. Mix well. Either dip or spread the chocolate onto the cooled cookies. These cookies keep very well for a week or more in a tightly sealed container.


 Put all the dry from the food processor into a large bowl, adding the nuts, and then, with a fork, stir in the pumpkin mixture. Work quickly mixing all the ingredients together until just blended. Do not overwork the dough or our scones will be heavy and tough.
 Dump the batter onto a lightly floured board. Knead lightly until smooth and form into a round or square shape.
 Then roll to a thickness about 3/4″ high and approximately 8″ in diameter. The shape will depend upon how you want to cut them. The batter should still be soft and sticky. By dipping the biscuit cutter or knife into flour after every cut, you avoid squishing the dough together. Try to make clean cuts, not twisting or turning the dough. Whether you cut the scones into rounds or triangles or squares is all up to you! If you have any scraps after cutting, reform the dough and continue making more.
 Transfer the cut pieces onto a parchment lined baking sheet by again dipping a spatula into flour and lifting from underneath. Try not to compress the dough or add too much pressure. Arrange the scones on the baking sheet about 1/2″ apart. They will rise while baking. Brush the tops of the scones lightly with melted butter and sprinkle with brown sugar. Then place the baking sheet into the refrigerator for at least 30 minutes (or more). Only then should you preheat the oven to 425°.


 gns outside their shop or home, something that could easily be identified. A blacksmith might hang the sign of an anvil. A joiner (carpenter) might hang a hammer. If a home was open to the “public”, some foliage or a green bush was hung outside the door to signify that ale was served.
 Along with the church, pubs became the hub of social activity. Villagers would meet to share stories, exchange ideas, relax and enjoy a home-brewed pint. With many people not knowing how to read, you simply mentioned the sign of the public house, such as
