
With this world wide global marketplace in which we now live, it seems we have available anything we want from anywhere at anytime. Teas from China … cotton sheets from Egypt … woolen scarves from Scotland … wild salmon from Alaska … it’s all there in the stores. But, when you want some Jaffa Cakes, where can you find them? I realize, of course, most everything you can think of is available through Amazon (at an exorbitant price, I might add), but we were hoping to find these inexpensive and delectable little nuggets of deliciousness in the International food aisle from at least one of the big supermarket chains, and not have to wait for the delivery man to walk down the driveway in two or three days. 
For those of you who don’t know what a Jaffa Cake is, it’s a small not overly sweet, cake-like cookie with an orange-flavored gelatinous disc in the center, topped with dark chocolate. They’re inexpensive, sold in packages and are available everywhere in the U.K., from supermarkets to convenience stores, and loved by everyone. And, yes, they were a baking challenge on one of the earlier Great British Bake Off programs.
Well, if I can’t buy them, then here’s another baking challenge – Jaffa Cakes. As always I begin by doing a little online research. It astonishes me that you can see the exact same recipe on a dozen different ‘home baker’s’ sites. Do they just copy and paste from one to another?
From the web, I printed a couple of recipes and then took out my British cookbooks. Now which recipe to try? The first recipe was Mary Berry‘s, which was confusing because it said to ‘break the jelly into pieces’. Wasn’t sure what that meant. Next was Paul Hollywood‘s recipe which also called for me to ‘break the jelly into cubes’. Apparently, this is an ingredient we either don’t have here in the U.S., or we call it something else. I decided to make my own orange filling with gelatin, orange juice and sugar. It didn’t really work. Okay then, why not use orange flavored JELL-O? Which I did and it worked perfectly. After many tries and fails, converting grams to cups, and wondering why all British recipes call for “free range” eggs, here’s my recipe. I hope you like it!!
JAFFA CAKES
Bake at 350°. Makes 12 – 2″ cookies. Equipment needed: muffin tin and/or whoopie pie tin
2 large eggs, room temperature
1/4 cup sugar
1/2 cup all purpose flour
1/4 teaspoon baking soda
pinch salt
1 3 oz. package orange-flavored JELL-O
1/3 cup boiling water
1-1/2 cups semi-sweet chocolate chips
butter for greasing tins
 Make the filling first by dissolving a packet of orange-flavored gelatin into 1/3 cup of boiling water. Spray or grease a 12 count muffin tin. Into the bottom of each cup put a tablespoon of the gelatin. Put the tin into the refrigerator for the gelatin to set. When the gelatin has set completely, remove each disc from the muffin tin and place on a dish. Place the dish back into the refrigerator until its time to assemble.
 Using a stand mixer or hand mixer, beat the eggs and sugar together for at least 5 minutes until delicate, pale and frothy. Sift together the flour, baking soda and salt. Carefully fold the dry ingredients into the egg mixture. Be careful not to deflate the eggs. Put 2 tablespoons of batter into the bottom of each of the greased muffin cups and bake at 350° for 7 to 8 minutes or until pale but baked through.
 Remove the muffin pan from the oven and let cool for a few minutes. Then remove each cake/cookie and let them cool completely on a wire rack. Meanwhile, over a bowl of very hot water, melt the chocolate chips, stirring as necessary until smooth and shiny. Let cool a bit.
 To assemble: take a cake/cookie and place an orange disc on top and quickly place a spoonful of the chocolate on top of the disc. Using the back of a spoon, spread the chocolate, sealing in the orange wafer. Place the cookie back onto the rack. When they are all assembled, using the tines of a fork, gently make a criss-cross pattern on each of them*.
 They may not be as pretty as Mary Berry’s Jaffa Cakes, but they taste pretty darn good. Tasty little cakes with an orange filling and chocolate frosting. If you wanted to make these ahead, I’m sure they’d probably last a few days, but definitely not in our house!
*As you can see, I tried … but failed miserably at this.
_____________________________________________________________________________


 First, warm the milk in the microwave (not too hot) and stir in the yeast and the sugar. Let it rest for 10 minutes until its frothy.
 In a large bowl, stir together the flours and the salt. Add the warm milk mixture and stir together until a thick dough forms. If using a stand mixer, use the paddle attachment. Let it mix for about 3 or 4 minutes.
 No need to take it out, knead it and grease the bowl. Just cover the bowl with a towel and put it aside to rise for about an hour, or until the dough has doubled in size.
 When it has doubled and will hold an indentation from your finger, it’s ready. Mix together the cup of water with the baking soda. Now comes the tricky part, mix this liquid into the dough. It’ll be difficult at first. I used a fork to break the dough up, and then beat the mixture with a wooden spoon until it was somewhat smooth (but not perfect … still a bit lumpy).
 Using a ladle or tablespoon, spoon equal portions of the batter into the molds. The batter will be sticky and gloppy. Don’t be concerned. That’s how it’s suppose to be. Keep an eye on the heat to be sure they don’t burn on the bottom, turning it down as necessary. They will rise and as with pancakes, they will be almost fully cooked before they need to be flipped over (about 6 minutes on the first side). When the top has lost its gloss and the sides look firm, remove the rings. The rings will be hot, so use tongs. With a spatula, flip the crumpets over and let them cook on the other side for just another minute.


 First, line up all your ingredients. Don’t be one of those bakers who goes looking for things as you go along. If you have everything in front of you, you’re less apt to make a mistake and forget something. Then, preheat your oven and prepare your pan. Most ovens take 20 minutes or more to heat up thoroughly. A $5.00 oven thermometer is a great investment and saves a lot of baking disasters.
 In a large bowl (or food processor) add the dry ingredients. Mix well or pulse two or three times. Cut the icy cold butter into cubes and add it to the dry ingredients until it resembles fine crumbs. Again, if using a food processor, PULSE 10 or 12 times … no more!
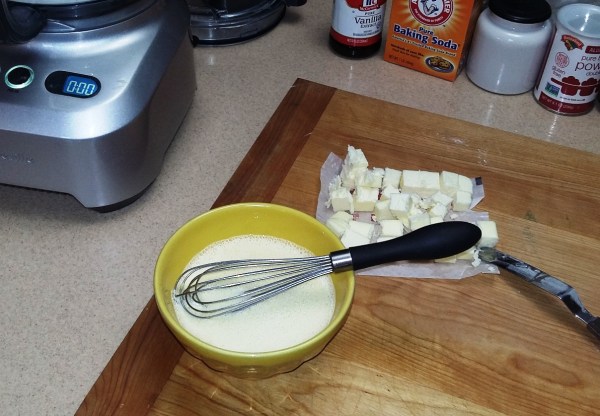 In a small bowl mix together the egg, milk and vanilla. Then add this wet mixture to the dry mixture. Stir it in with a fork or PULSE a few times just to combine everything.
 Turn the mixture out onto a floured board. Knead a few times to bring it together. Do not overwork the dough or your scones will be tough and won’t rise properly.
 Form the dough into a round and with a rolling pin, gently roll until you have about 3/4″ thickness. Cut the dough into triangles (or you can use a cutter to cut out shapes). Place the triangles onto a parchment lined baking tray.
 In another small bowl, mix the chopped nuts, sugar and cinnamon. Sprinkle over the scones, pressing down lightly to fix them onto the scones. This is completely optional.
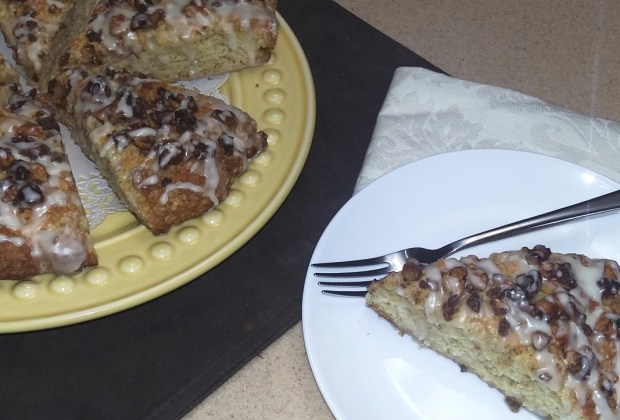


 Add the cubed fish and fold in gently. You don’t want to break the fish up. If you have leftover boiled potatoes, add them now … or any leftover veggies you may have. Turn off the heat and dump everything into a large casserole or pie plate.
 Take the pastry out of the frig and, on a lightly floured board, roll it out to fit the casserole or pie plate. Be sure to cut an air hole in the center of the pastry for the steam to escape.
 Be sure to put the casserole onto a baking tray to catch any spillage … and there will be spillage. Bake at 425º for 40 to 45 minutes until golden brown and bubbly.


 The illustrations in this book are remarkable in that they are not photographs but drawn capturing the precise details from each original baked item. The images of wedding cakes are astonishingly beautiful, each having won prizes at the London International Exhibition 100 years ago.
 In addition to the advice and recipes are the original advertisements for all the baking essentials required, from flours and sugars to cake stands and ovens. One advertisement which I found interesting was for a “vegetable butter” made from “cocoanuts, as an excellent substitute for butter, margarine and lard”. Why has it taken us another 100 years to fully incorporate coconut oil into our baking?
 Tomato Jam! The “world wide web” had done it again! Tomato Jam it was going to be. I narrowed it down to three of what appeared to be, from the reviews, reasonably successful recipes on three reasonably successful websites. Before trying any recipe from any website, I always check out the reviews. Most of the reviews are merely comments from people saying “how good that looks”, or “I can’t wait to try this” yet never having made it. Or, “this was delicious after I added ‘this, that or the other’ and ‘cooked it for'”. So, it can be a bit frustrating and does take a bit of sifting through each review to find those who actually have made the ‘original’ recipe.
 This is beginning to sound like Goldilocks and the Three Bears. All the recipes did agree, however, that the jam would be sweet, spicy and delicious … a wonderful spread on sandwiches, with cream cheese and crackers, as a condiment or dip.
 That evening I take one container out and, yes, it’s finally thick, rich, sweet, spicy Tomato Jam! Hooray! What the problem was, I will probably never know. Were my tomatoes too juicy? Should I have removed the seed pods? Did the other recipes intentionally mislead readers? As for now, Tomato Jam is on the table and we’re going to enjoy it tonight as a spread on our leftover pot roast with goat cheese, arugula and sauteed onion sandwiches.


 My newest addition is Nordic Ware’s Crown Bundt pan. If nothing else, it’s absolutely gorgeous! This heavy, 10-cup mold is going to be perfect for so many different recipes … from my traditional (yet hardly ever eaten) Thanksgiving Jell-o mold (a story for another time) to quick breads and cakes to meatloaf … why not? I think it will make anything look spectacular.
 Prepare the filling by mixing together the toasted, chopped pecans with the brown sugar and cinnamon. Set aside while you make the batter.

 Spoon 1/3 of the batter in the bottom of your prepared pan. Sprinkle half the pecan filling evenly over the batter. Spoon another 1/3 of the batter on top of the filling and then the rest of the filling on top of that. Finish with the rest of the batter.
 To my surprise this recipe made more than the pan could comfortably hold. There should be at least an inch of room to the top of the pan. (We’ll see what happens when I bake it.) Be sure to tap the pan onto the counter to ensure there are no air pockets. Bake for at least 50 to 60 minutes (depending upon the size and depth of the pan).
 Lordy, lordy, lordy … look at that monster! I guess I was right … too much batter! As Emeril Lagasse used to say on his tv program, “this is real cooking, folks!”
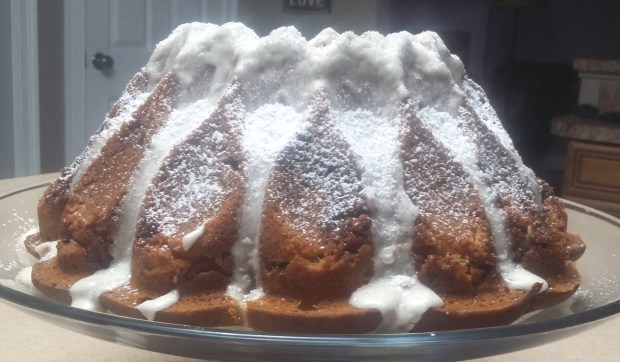 When ready mix together the glaze and pour over the top. Or, just sprinkle with confectioner’s sugar. (Or both.)
 Using a stand mixer (or hand mixer), beat the butter and sugars together until light and fluffy. Then add the vanilla and beaten eggs.
 In a separate bowl, sift together the flour, oats, baking soda and salt. Add the dry ingredients to the wet ingredients. You can use a big wooden spoon, or, if you are like me, you just switched out the paddle on your stand mixer to the bread one.
 Add the chocolate chips and the walnuts to the batter. Mixing well. If you don’t like nuts, leave them out, and add more chocolate chips. They’re your cookies.
 On parchment-lined baking sheets, drop spoonfuls of dough (or with an ice cream scoop). The size is up to you. Larger ones will take another minute or two to bake, but PUHLEEZE don’t overbake these cookies. They need to be a bit soft in the middle and gooey!
 After spooning the dough onto the baking trays, dip the bottom of a drinking glass into flour and press onto each ball of dough. You want to flatten them slightly. If you are making these ahead, you can chill the trays at this point, if you like, up to four hours.
 Bake at 350° for 12 to 15 minutes … again, depending upon the size. If you want small, “adult-sized” so that you can eat three or four and not feel guilty, fine. And, if you want one big “two hander”, go for it! Just remember …. underdone is best!

 In a large bowl or food processor (which I prefer), mix or pulse together all dried ingredients: flour, baking powder, salt, sugar, lemon zest and lavender.
 Using your fingers or a fork, work butter into dry ingredients until just crumbly. If using a food processor, pulse 8 or 9 times.
 Whisk together egg, lemon juice and heavy cream and add it to the mixture. With a fork, bring together quickly. Do not overmix or scones will be heavy.
 Dump the mixture onto a lightly floured board. It will be a bit crumbly. Knead two or three times to bring the dough together. Again, do not overwork the dough.
 Shape into a round about 1/2″ thick. Cut the desired number of scones you’d like … in the shapes you’d like. Round. Triangular. Square. It’s up to you. I decided to be creative and cut mine to resemble a flower.
 Remove from the oven and cool on a rack. (Unfortunately, the angle of the photo doesn’t show how much they’ve risen.) For confectioners’ glaze, mix together four tablespoons confectioners’ sugar and 1 teaspoon milk. When the scones are cool, drizzle with confectioners’ glaze.
 How do you like my scone flower?
 Be sure to put the kettle on and have your cuppa ready because you’re going to want to dive right into these … well, at least, I did!