
I was watching a re-run recently of one of the older Great British Bake Off episodes (yes, I do watch them over and over again) and the technical challenge presented by Mary was an “Angel Food Cake”. The contestants all appeared completely baffled by this challenge, but I smiled to myself, knowing that I had actually made one . . . a long time ago.
I remember it distinctly. It was 1972 and I had never made a cake before … a real ‘from scratch’ cake. The recipe was straight out of the only cookbook I owned (but don’t remember where it came from), the Better Homes and Gardens cookbook. My recipes generally came from  magazine and newspaper clippings – with pictures, of course, so that I would know exactly what the finished dish was suppose to look like.
You may have seen this classic cookbook on a shelf in an antique shop or used book store . . . a three-ring binder with a red and white gingham cover. This cookbook actually taught me how to cook and became my bible in the kitchen.
The cake was an Orange Angel Food Cake. There was no special occasion and I don’t really know why I selected this cake. Perhaps it was because I had a dozen eggs which were getting old and a bag of oranges which I didn’t want to go to waste. I also don’t remember how I had obtained an angel food cake pan, but I had one … and still do. So, following the instructions very carefully, I took on the challenge and remember being quite proud of myself when it came out . . . perfectly baked . . . light and fluffy . . . with a delicate citrusy orange flavor.
Have I made this cake since? No. And I’m not sure why. But after watching the GBBO episode, I’m feeling a bit nostalgic . . . plus I have a dozen eggs, a bag full of oranges, and an angel food cake pan. So, let’s give it a try!
ORANGE ANGEL FOOD CAKE
Preheat oven to 325°. Do not grease the cake pan. (Something the contestants did not know.)
8 eggs yolks
2/3 cup sugar
1 tablespoon grated orange peel
1/2 cup freshly squeezed orange juice
1 cup cake flour, sifted
8 egg whites
1 teaspoon cream of tartar
1/2 teaspoon salt
2/3 cup sugar
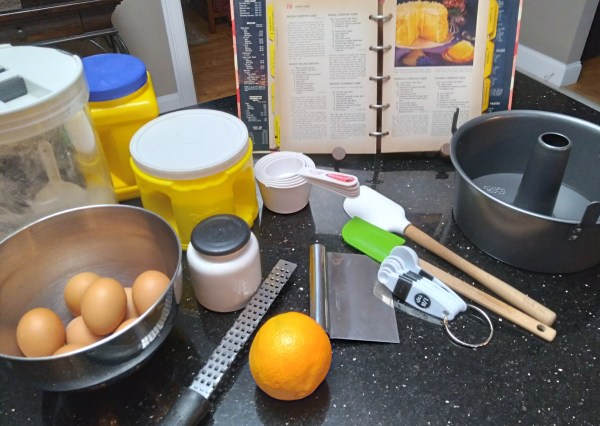
I always line up all the ingredients when baking. It’s so easy to forget something … and it could be as simple or important as salt.
 Separate 8 large, room-temperature eggs … put the whites aside.
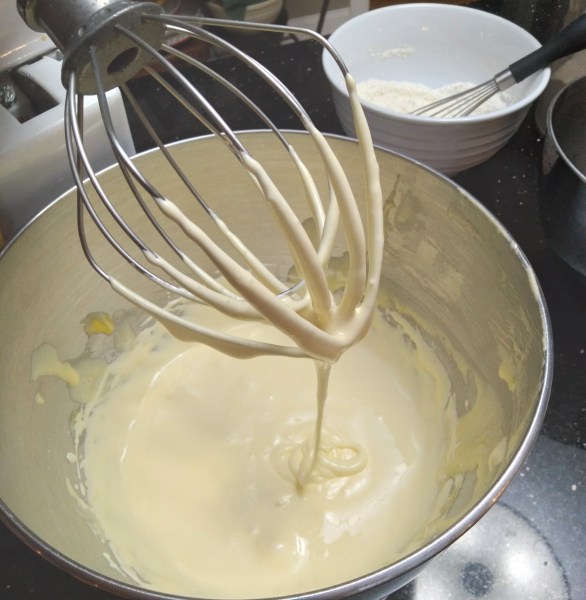 Beat the egg yolks until thick and lemony-colored. Gradually add 2/3 cup sugar. Beat until gloriously thick. Combine the freshly-squeezed orange juice (freshly-squeezed gives the best flavor) with the orange peel. Add this to the egg yolk mixture alternately with the cake flour. Set aside.
 Beat the egg whites with the cream of tartar and salt until the soft peak stage. Very gradually add the other 2/3 cup sugar. Beat on high until stiff peaks form … but do not overbeat. The egg whites should be stiff but not be dry.
 Gently fold the egg whites into the egg yolk mixture.
 Pour into the ungreased 10″ tube pan (or whatever pan you’d like to use). Angel food cakes do not need to be baked in a specific pan. Loaf pans are fine. Bake in a 325° oven for about 50 to 60 minutes.
 When done, a tester will come out clean, the sponge should spring back when touched and the color will be a delicate golden brown.
 Invert the tube pan to cool the cake. Yes, that is what the ‘feet’ are for. After approximately 20 minutes, the cake should easily come out of the pan. Turn right side up. Frost when cooled.
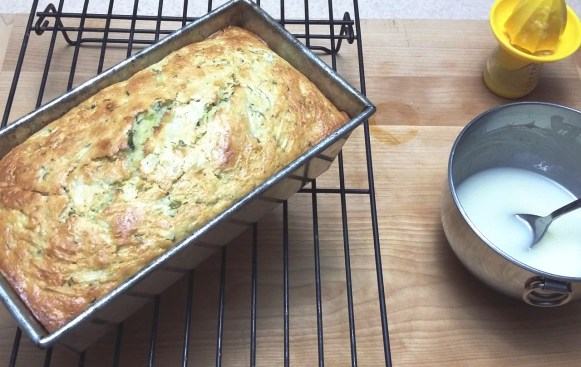
 Is it a “show stopper” as Mary would’ve liked to have seen? No … but I’m very happy with it. The cake is feathery light with just a subtle hint of citrusy orange. I made a quick seven-minute frosting and decorated it with candied orange slices.
This is the perfect cake for after a heavy meal when you want something sweet, but not too sweet or rich … or when you want to impress your guests (because they will be impressed). It may have taken me almost 50 years to make this the second time, but you know I’ll be making it again very soon! Yummy!!
_____________________________________________________________________________


 Make the filling first by dissolving a packet of orange-flavored gelatin into 1/3 cup of boiling water. Spray or grease a 12 count muffin tin. Into the bottom of each cup put a tablespoon of the gelatin. Put the tin into the refrigerator for the gelatin to set. When the gelatin has set completely, remove each disc from the muffin tin and place on a dish. Place the dish back into the refrigerator until its time to assemble.
 Using a stand mixer or hand mixer, beat the eggs and sugar together for at least 5 minutes until delicate, pale and frothy. Sift together the flour, baking soda and salt. Carefully fold the dry ingredients into the egg mixture. Be careful not to deflate the eggs. Put 2 tablespoons of batter into the bottom of each of the greased muffin cups and bake at 350° for 7 to 8 minutes or until pale but baked through.
 Remove the muffin pan from the oven and let cool for a few minutes. Then remove each cake/cookie and let them cool completely on a wire rack. Meanwhile, over a bowl of very hot water, melt the chocolate chips, stirring as necessary until smooth and shiny. Let cool a bit.
 To assemble: take a cake/cookie and place an orange disc on top and quickly place a spoonful of the chocolate on top of the disc. Using the back of a spoon, spread the chocolate, sealing in the orange wafer. Place the cookie back onto the rack. When they are all assembled, using the tines of a fork, gently make a criss-cross pattern on each of them*.
 They may not be as pretty as Mary Berry’s Jaffa Cakes, but they taste pretty darn good. Tasty little cakes with an orange filling and chocolate frosting. If you wanted to make these ahead, I’m sure they’d probably last a few days, but definitely not in our house!
 Remove from the heat and add the vanilla and butter. Stir til smooth.
 Now it’s time to cut inside each individual square. Cut a 1/4″ border around each square except for two corners. Leave two corners intact. Take one cut corner and bring it over to the inside of the other side. Now do the same with the opposite corner. You should have a diamond pattern (or envelope). Press down slightly around the edges.
 Place the shaped puff pastry on parchment-lined baking sheets and place the baking sheets. Square them off a bit and place the baking sheets into the refrigerator. Puff pastry puffs up much better when its very cold. This is when I preheat the oven.
 Bake the pastry til golden brown, about 20 mins. Remove from oven. Now take a sharp knife and remove the center portion of each pastry, creating a pocket, or cavity for the pastry cream. Place each pastry on a wire rack and let cool completely.
 Now its time to assemble. What could be easier … spoon (or pipe) a dollop of pastry cream into the center of each individual pastry. Place a sliced strawberry on top and sprinkle with powdered sugar. Arrange your pastries on a serving tray until ready to serve. Then show them off to all your guests and wait for the oohs and ahhs. You deserve it!


 e cooking apple (not a Mac or Macoun – too juicy).
 Pour the batter into the prepared pan and bake for one hour. Test after about 50 minutes for doneness.
 When done, turn out onto a cooling rack and then put the kettle on.